
Is there anything better than homemade maple syrup on a stack of pancakes? Today’s garden tip article is all about creating the delectable treat made simply from the humble maple tree. It comes to us from West Virginia’s Chris Feick.
Tapping the tree
The making of homemade maple syrup is certainly a bit labor intensive. But as Chris explains below, one taste of the finished product, and it all becomes worthwhile! Not only does Chris do an excellent job of explaining the process from start to finish – we especially love the story on how he first got the bug to make his own!
Lets take a look at how Chris makes his homemade maple syrup:
How To Make Maple Syrup – By Chris Feick
People often ask me how I got started making maple syrup, and they laugh when I tell them the answer. Obviously, it’s not something that too many people are doing in their back yards.
One day, I was watching Curious George on TV with my youngest son. In the episode that particular day, George (a very curious little monkey) was watching a farmer tap maple trees, collect the sap, and cook it down until it became maple syrup.
And, being an educational kids’ show, they actually went into a fair amount of detail on the process at a pre-school level (which is perhaps why it caught my attention).
The tools of the trade for making homemade maple syrup
As I watched that simple cartoon, I thought to myself “I could do that”. And so I did. And I’ll tell you, there’s nothing like fresh, real maple syrup. The taste puts Aunt Jemima to shame.
There’s plenty of good information on the internet about how to make maple syrup. One site that I constantly reference is tapmytrees.com.
I’ve adapted information from this site as well as others for my own situation. So here is how I make my own maple syrup. It’s actually fairly simple and inexpensive. The biggest investment of all in the entire process is time.
The first step in making maple syrup is finding some maple trees. If you’re not adept at identifying trees on sight (I only know a few), here’s the easiest way to tell. Look at the leaves. Maple leaves have a distinctive shape, like the Canadian flag. For more information on identifying maple trees, check out : Maple Trees-Wikipedia
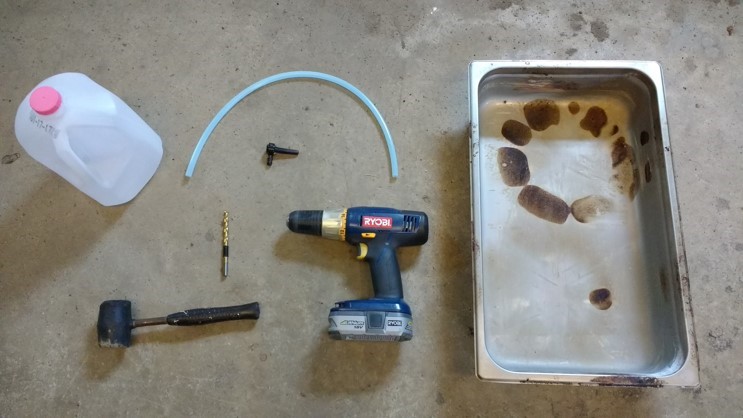
Next, assemble the right tools. You’ll need a drill with a 5/16″ bit, a rubber mallet, containers to collect the sap, something to cook it in, cheese cloth, and of course, syrup taps (or spiles).
I get my taps from Amazon. The kind I buy have plastic spiles plus a short rubber tube. See: Maple Syrup Spiles. I also use a large restaurant type metal serving pan. We’ve found the sap cooks faster if there’s a larger surface area exposed to the heat. For containers to collect the sap, I save empty gallon milk jugs.
The tapped tree ready to collect
Once you have all the materials, it’s time to tap some trees. The best time of year for maple sap to flow is when the temperatures are consistently below freezing at night, but rising into the high 30’s or lower 40’s during the day. Where I live, that is mid to late January through February.
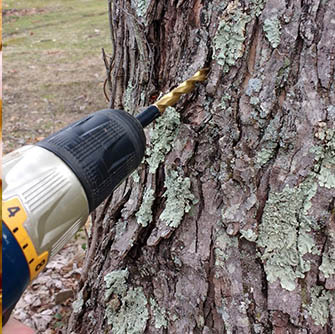
To tap the tree, I drill a 1.5″ to 2″ deep hole at a slight upward angle into the tree. I’ve found that wrapping some tape around the drill bit at the appropriate length makes it easy to make consistent holes.
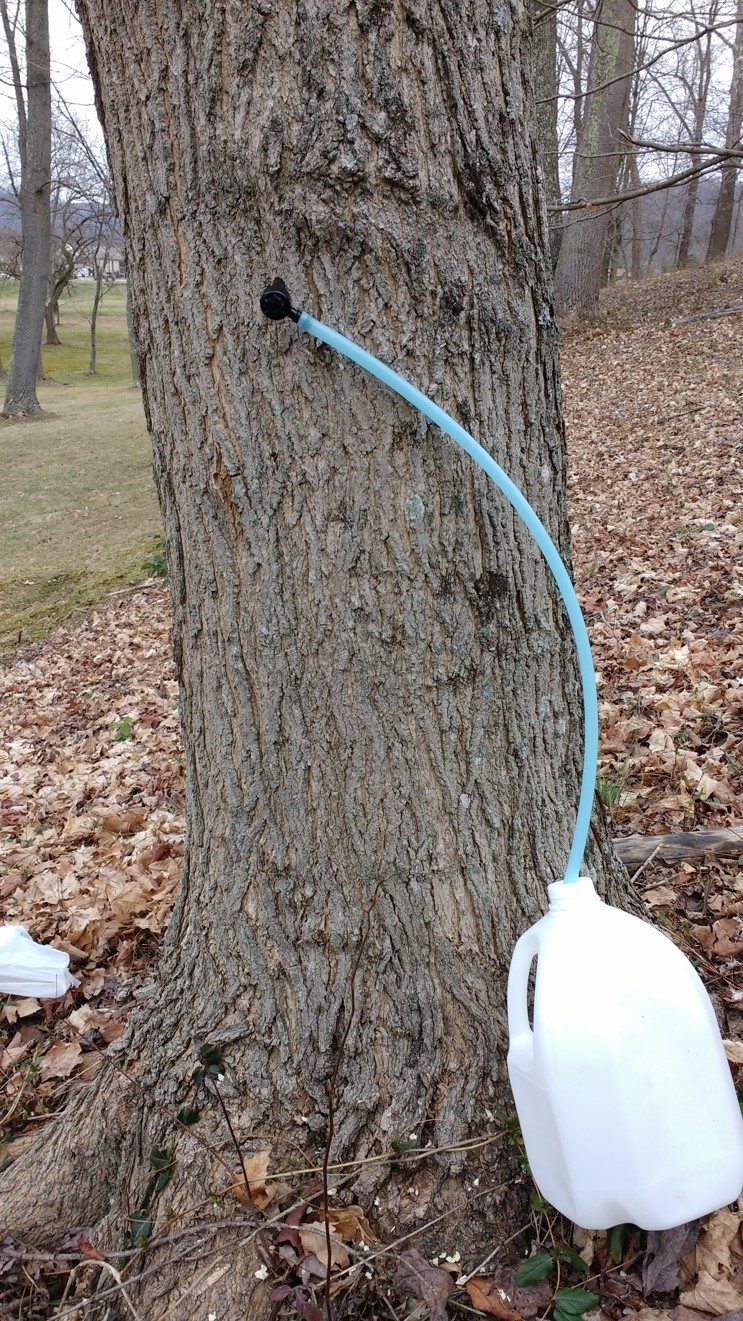
If you’re using the spiles and tubing I use, you’ll want your hole to be about two and a half feet up the tree. Using the same bit, drill a hole in the lid of a milk jug. Gently hammer the spile into the tree with the outlet pointing down. Only hammer until the spile is secure, if you drive it in too far, you’ll have trouble getting it back out.
Connect the tube to the outlet of the spile and shove the other end into the hole in the milk jug lid. When you’re done, the jug should rest on the ground. And then wait for the jug to fill up with sap!
I usually try to check my jugs every day or at least every other day to collect the sap. I’ll replace full jugs with empty ones and collect the sap out of any jugs that aren’t full. One challenge can be storage of the sap until you have enough, or are ready to cook it.
That’s the hardest part for me. We simply don’t always have consistent times that we can cook the sap. The amount of sap you collect will vary from day to day, and tree to tree. Some of my trees will fill a gallon jug in a day, others not so much. And if the temperatures stays below freezing or well above freezing for several days in a row, the sap flow will slow down, or even stop.
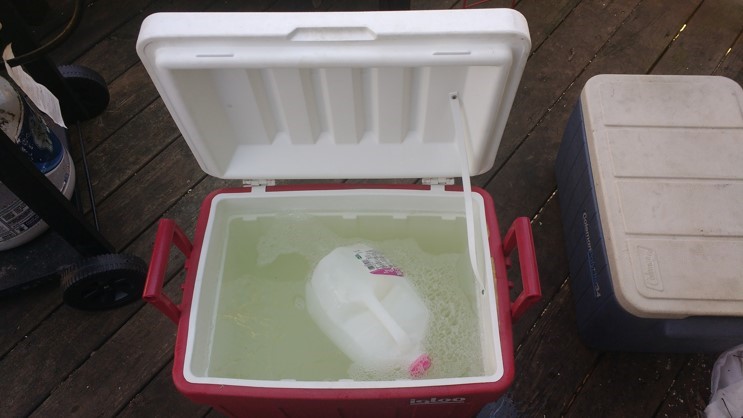
Sap in the cooler, waiting to be processed
I’ve found that it requires about 8 gallons of sap to get 1 pint of syrup. So we end up needing to store a lot of sap, especially if we have a busy week and can’t cook it until the weekend. I used to try to cram the sap jugs into the refrigerator or freezer as sap can spoil, but that process became unsustainable. This year, I borrowed a few medium size coolers to dump the sap into. I just freeze a couple of the full jugs and place them in the cooler filled with sap to keep it all cold.
When you’re ready to cook the sap, just pour it out of your jugs into the pan you will be cooking it in. Our serving tray sits perfectly on our gas range over top of two burners. Bring the sap to a boil. It takes a long time (pretty much all day) to get 8 gallons of sap cooked down. You don’t need to sit and watch the sap boil for the day, but I recommend checking on it every 30 minutes or so and adding more as the sap cooks down.
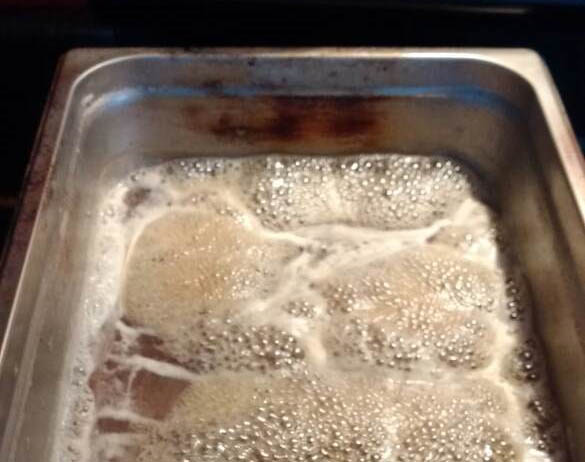
Maple syrup boiling down
Keep a count on how many gallons you have cooked down to get an idea of how many pints of syrup you will have at the end of the process. If you run out of time, you can always put it in the fridge and finish it another day. Once it gets to within a couple of inches of the bottom of the tray, we transfer it to a smaller pot to finish.
You can tell when it’s done as it will turn from mostly clear, into a rich amber color. The syrup will coat a spoon and barely collect on the edge when you turn the spoon on its side. Strain the syrup through a cheese cloth to remove particles and the foam that forms during the cooking process.
Place the syrup into hot sterilized pint jars, screw on the lid, flip the jar upside down and the heat of the syrup will seal the jar.
The sap flow from the trees will pretty much stop on its own, letting you know when the season is over. I’ve heard some people say to stop when the trees start to bud. I just let the tree tell me when it’s time to stop. You can then pull out the taps and recycle all the milk jugs. You should sterilize the spiles and plastic tubes in some bleach water (I do that in the tub).
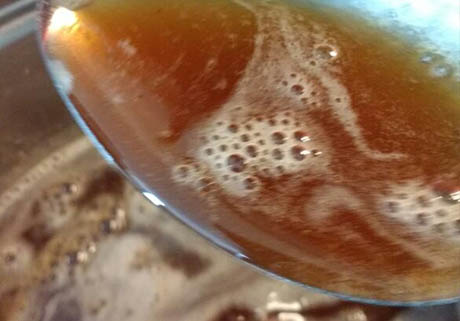
Checking the consistency of the syrup
After the spiles are out, I’ll hunt around on the ground for sticks about the same diameter as the hole in the trees. Jam the stick in the hole and break it off even with the trunk to keep insects out of the holes. The tree will eventually seal up the hole around the stick.
That’s the process. It’s a lot of work. Every year we hit a point when we question whether it’s all worth it. It might be after trudging out in the backyard in the cold, snow and mud to collect the sap, or when the sap seems to be overwhelming us and we’re spending entire days cooking it.
But then we pop open a jar of the most wonderful syrup you’ll ever taste and know that there’s only one ingredient.And it’s really easy to spell: S-A-P. And then we can’t wait to do it all again next winter. The only way that I can describe homemade maple syrup is with two words : “Liquid Gold”.
Share Your Gardening Tips And Advice With The World!
What a great article Chris! Thanks so much for sharing!
Do you have a garden or landscape tip or story you would like to share? Then email us today at info@thisismygarden.com. You can also use our “Feature My Garden Tip” button at the top of the website for your entry. Help make This Is My Garden the best garden site around and share your garden knowledge with fellow gardeners!