
If you are looking to create a few comfortable, sturdy and beautiful outdoor chairs for your patio, porch or fire pit, today’s DIY 2×4 Adirondack chair article is right up your alley. Not only is it fun and easy to build – the chairs are strong and comfortable too!
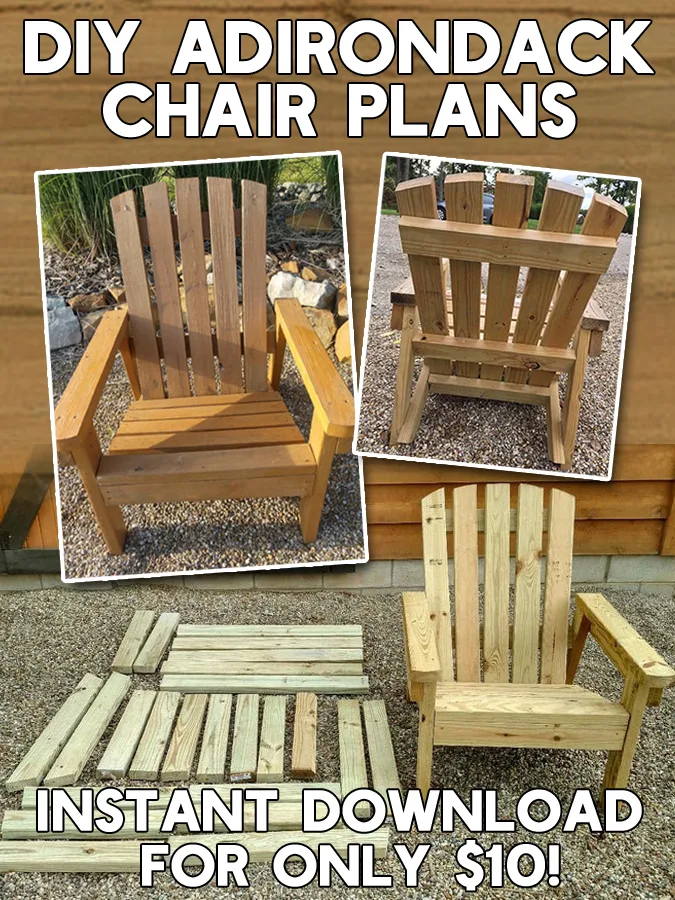
The 2×4 chair project featured today is from our sister site Old World Garden Farms. It has been the number one downloaded plan for 5 straight years on that site, and it’s not hard to see why – the chair is not only simple to build, it looks great anywhere. And is it ever tough!
One of the most difficult challenges for outdoor seating is finding chairs that last. Especially when you consider how much it can cost these days to buy patio furniture.


Even the flimsiest of cloth, canvas or plastic chairs can be quite expensive. Unfortunately, even though they can be costly, they rarely hold up for more than a year or two. In fact, they often don’t even make it through a single season without falling apart.
The lightweight chairs are no match for a summer storm or high winds. And if that doesn’t do them in, the lighter chairs never seem to be able to hold very much weight without collapsing. That is exactly where the 2×4 Adirondack chair comes to the rescue!
The Perfectly Sturdy Outdoor Chair – How To Build Best DIY 2×4 Adirondack Chair Around!
The OWG 2×4 chair is designed with strength, durability and comfort in mind. Let’s first start with just how sturdy and tough this chair is. By using 2×4’s instead of thinner 1x or even 3/4 inch wood boards, the chair can hold up to the elements.
One thing is for sure, it is not going to blow away in a wind storm. The 2×4’s create a heavy duty chair that can stand up to the weather, whether it be rain, ice, snow or howling winds. Even better, it’s also not going to fall apart from the weight of someone sitting on it.

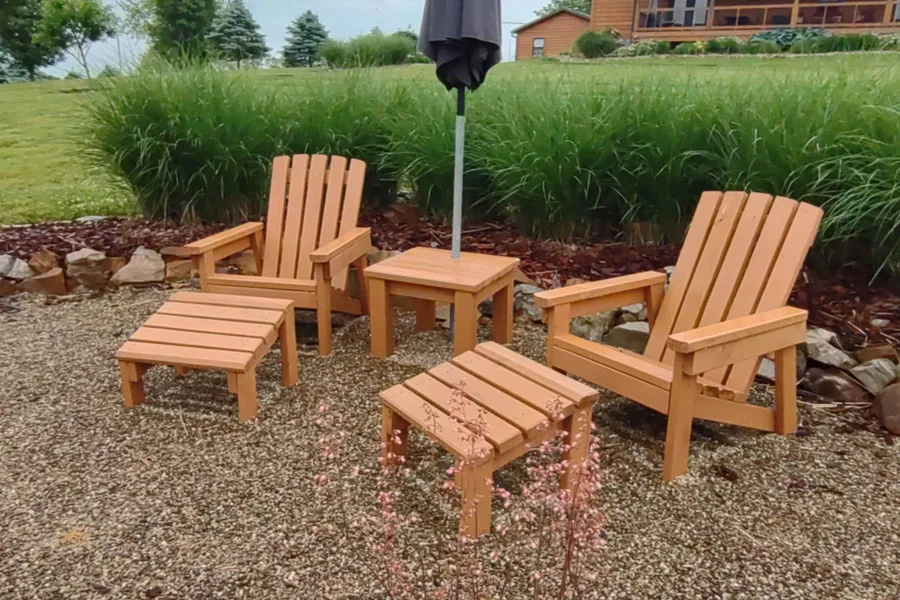
But beyond the sound construction, what is really surprising is just how comfortable the chair can be! With the angled back of an Adirondack design, it allows a person to rest with ease. It is comfortable with just the wood, but standard seat cushions fit the chair well and can make it even cozier.
And if you really want comfort, there are even plans for an accompanying foot stool that really adds the ability to lay back and relax!
Quick & Easy To Build – How To Build Best DIY 2×4 Adirondack Chair Around!
What really makes the chair unique is how quickly and easily you can build it from the plans. In fact, once you cut all of the 2×4’s, you can assemble a single chair together in just an hour to two!
Below is an overview of what it takes to build the chairs, including tools, lumber and assembly needs. If interested, you can find OWG’s instant download complete step by step plans with material and cut list in their Etsy store here : $10 Step By Step Adirondack Chair Plans

Creating The 2×4 Adirondack Chair Plans
The chairs can be built and assembled using just a few simple tools. There are a few angles to cut for bottom of the chair, and they can be made with a miter gauge and a hand saw, however the chairs are much easier to create if you have a basic jig saw and a compound miter saw for the cuts.
Beyond that, all you will need is a tape measure and a screw gun or impact screw driver. As for materials, the chair is built using eight (8) standard 8 foot long 2×4’s. The chairs are extremely affordable to build. Even with 2×4’s at $5 to $6 each, you can build an entire chair for under $50!
To build each chair, you start by cutting the 2 x 4 x 8’s down to 24 individual pieces. Most of the boards are all straight cuts, but you will need to use your miter gauge or miter saw to cut angles on 6 boards. For assembly you will need around sixty (60) 2.5 inch long exterior screws.
Choosing The Right Wood – How To Build Best DIY 2×4 Adirondack Chair Around!
You can use untreated 2×4 framing lumber, treated 2×4 lumber or even cedar 2 x 4 lumber for the chairs. If you will be painting or staining the chairs, untreated lumber is the least expensive way to go. Paints and stains can keep the chairs protected quite well.


Treated lumber and or cedar boards will obviously give a little extra protection and durability at an added cost. With treated lumber, you will have to allow it to dry out and weather first before painting or staining. If not, the moisture in the wood can make the paint or stain peel easily.
Assembly Order – How To Build Best DIY 2×4 Adirondack Chair Around!
Once you make all the wood cuts, the chair goes together fast. Although you can assemble it quite easily with just one person, a second set of hands is really helpful for fast assembly. You start by putting together the legs and base frame first. Once that is together, the seat boards go on next.
You create the chair back as one long separate piece. This is a really great feature as it allows you to select the best angle that is most comfortable for your chair. Once you have your angle, the final screws go into the base and attach making it solid and sturdy.
To complete the chair, two more 2×4’s go on top as handrails. At this point, you can then use the jigsaw to round of the arm rests for a really clean look. You can also round of the top boards on the chair if you like creating a chair that will hold up for years outdoors!
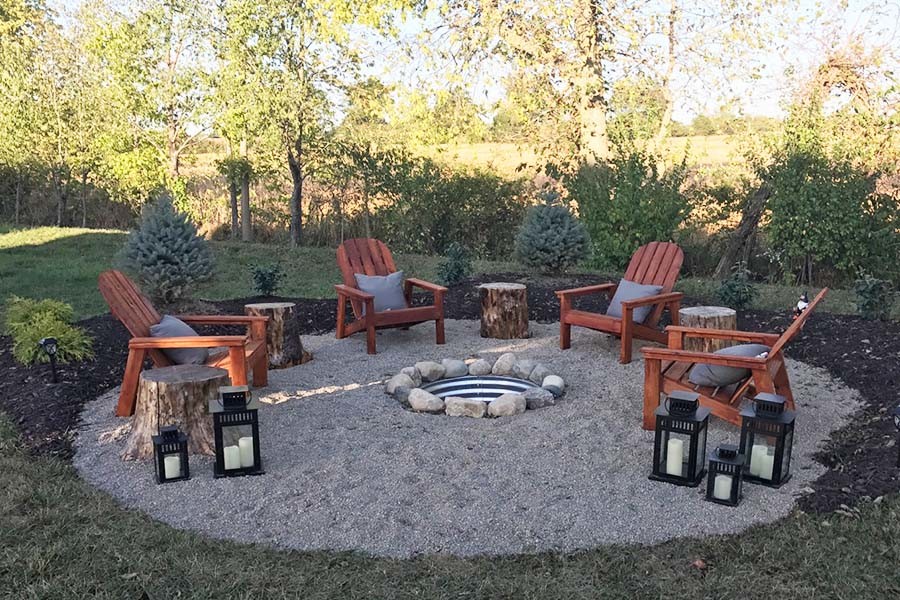
Here is to building your own 2×4 Diy Adirondack chairs this year – and enjoying the great outdoors in style! If you are looking for more outdoor seating options, check out our article on how to build your own beautiful garden bench – How To Create A Classic DIY Garden Bench For Your Home & Garden – With 2 x 4’s!
Follow Our Facebook Page For Great Gardening Tips And Advice! This Is My Garden Facebook Page
This Is My Garden is a garden website created by gardeners, for gardeners. Jim and Mary Competti have been writing gardening, DIY and recipe articles and books and speaking for over 15 years from their 46 acre Ohio farm. They publish three articles every week, 52 weeks a year. Sign up today to follow via email, or follow along!