Can anything really compare to the fresh taste of making something from the garden? A look at some of our favorite “Straight From The Garden Recipes”


Can anything really compare to the fresh taste of making something from the garden? A look at some of our favorite “Straight From The Garden Recipes”
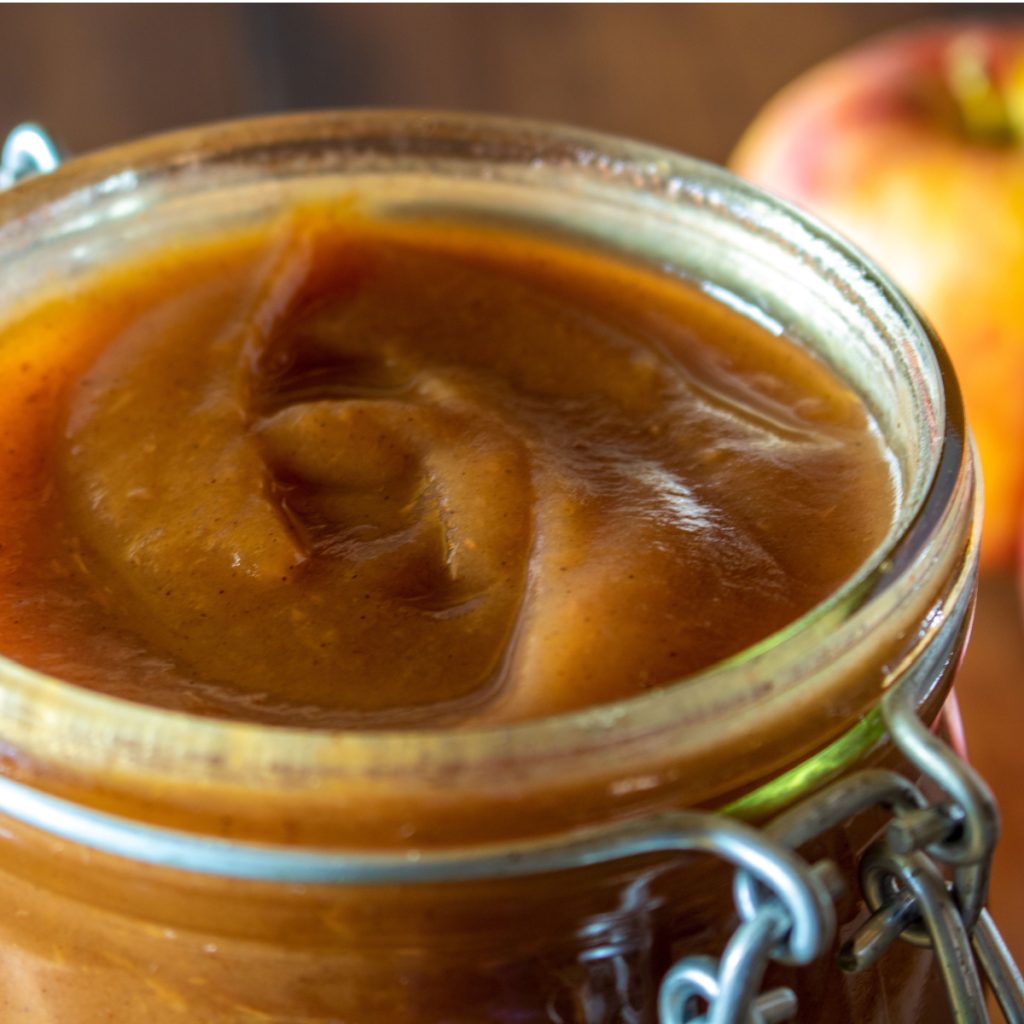
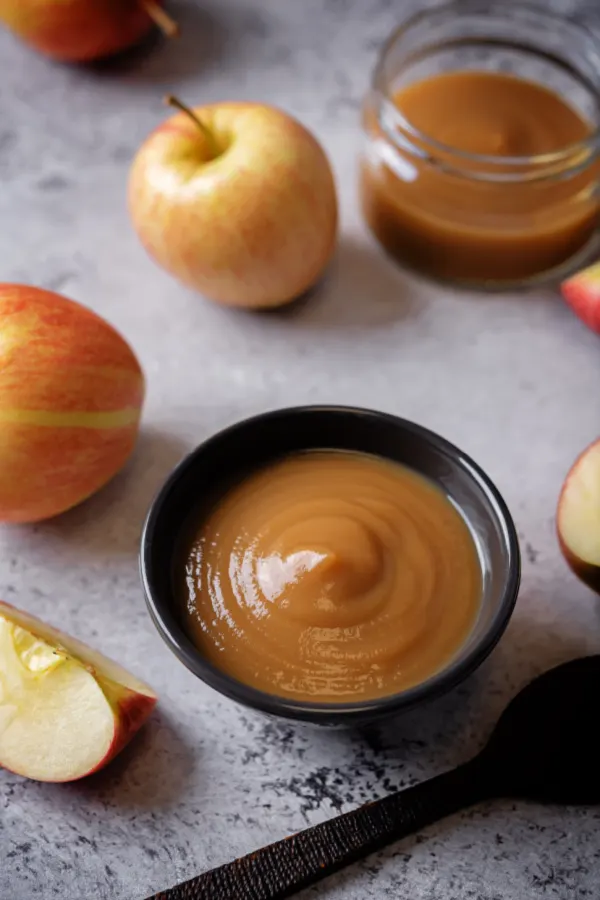
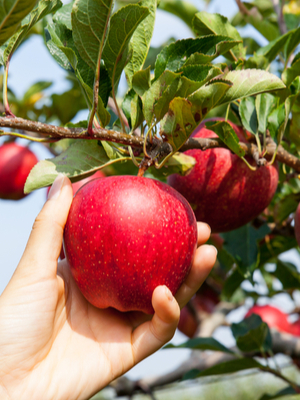
Looking to make some apple butter with all of those fresh apples that are in season this fall?
When it comes to the autumn season, pumpkin pie, hot chocolate and chili are always high on the list for sure. As are apple pie, apple crisp, pumpkin bars and pumpkin cookies as well. But for many, it has long been the taste of apple butter that really brings home the true flavor of fall.
Maybe it’s the rich, creamy texture, or the over the top apple flavor that can seemingly turn any slice of bread into the perfect anytime snack. Whatever it is, apple butter is just one of those fall treats that seems to celebrate everything good about fall – which is exactly why we thought today was the perfect time to share a simple recipe to make your own right at home!

So whether you have fresh apples falling from your own trees in the backyard or a local orchard nearby, here is a look at how to make your own delicious apple butter with fresh apples – and with ease!
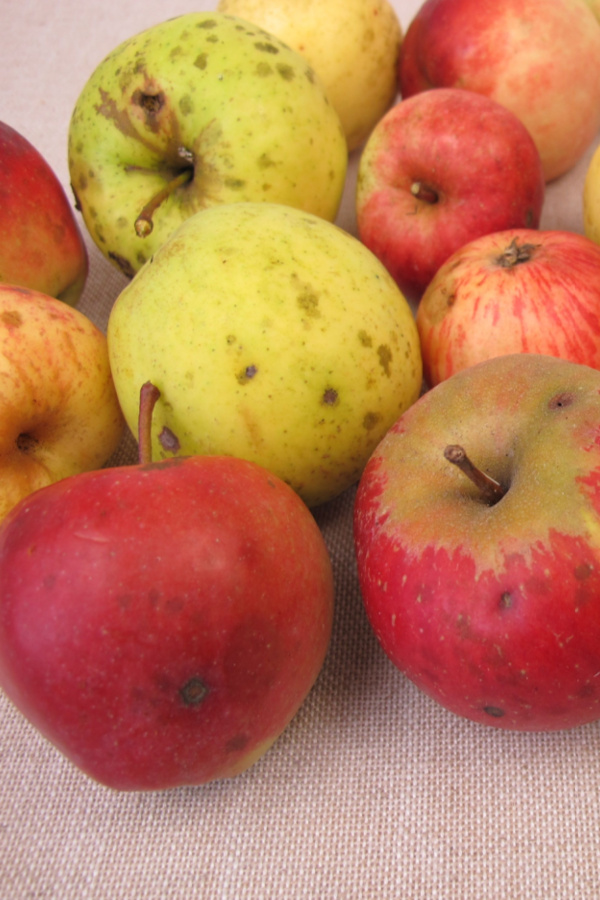
No matter what recipe you use, there is one secret to making great apple butter that is more important than anything else. And that secret? Just as when making great apple cider, always use more than just one variety of apple.
In fact, the more varieties you can throw in to the mix, the better. By using different varieties with differing flavor profiles, you can really add depth to the finished apple butter. In essence, it intensifies the flavor to a whole new level.
Fuji, Golden Delicious, Jonathan and Gala are all excellent choices. As are Red Delicious, Braeburn and McIntosh. The real key is to select several types of apples and mix them all together to get more flavor.

Unfortunately, not everyone is fortunate enough to be growing their own apple orchard in their backyard. But that doesn’t mean flavor getting all of those apples has to cost you an arm and a leg when it comes to making apple butter.
One of the best things about using apples for apple butter is they don’t have to be perfect apples. Not in shape, size – or anything for that matter.
Many orchards sell what they call “seconds”, which are apples that have blemishes or spots. Since you are peeling the apples and cooking them down, these apples work just fine. And best of all, they are usually available for a fraction of the price!
And don’t worry if you end up with too many apples with blemishes. You can also use those seconds for making great applesauce or apple cider too.


If there is one drawback to making apple butter, it’s the time it can take to make it. Traditionally, making apple butter has been a long, slow process. The apples were cooked down slowly over an open flame in a process that sometimes could take nearly a day.
But although those days have a lot of fond memories for people, unfortunately, not everyone has all day anymore. But thanks to a few modern conveniences like a blender, the process can certainly be much faster.
The recipe below is definitely one of our favorites when looking to make fuss-free apple butter. Not only is it ready in a fraction of the time as many slow cook recipes, it’s also extremely easy.
When it comes to making apple butter, the basics never change. You simply need to combine apples with cider and the appropriate spices. But instead of cooking down the apples down for 12 hours or more, this recipe uses a blender to move along the process.
Within a couple of hours, you can have the classic flavor and texture of homemade apple butter – and be ready to enjoy it for months to come. The recipe below can be modified to make more or less apple butter by simply adjusting the ingredients in equal portions.

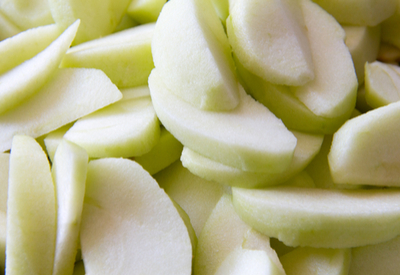
3 lbs. sweet apples – This is usually about 8 medium apples, but can vary with size and variety. Again, select at least two different varieties for a better flavor.
1 cup apple cider
1 1/2 cup sugar, divided
1/2 tsp. ground cinnamon
1/4 tsp. ground cloves
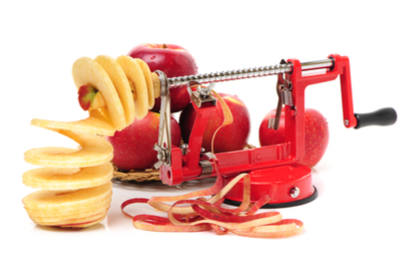
Begin by coring and peeling your apples. Cut into 1 inch chunks. To peel the apples, a regular vegetable peeler or paring knife will do the trick just fine. If you are making large batches, a hand crank apple peeler can make peeling fun and fast all at the same time!
The peelers are actually quite economical (around $20), and can be used for peeling potatoes as well. Product Link : Apple Peeler With Base
In a Dutch oven over high heat, add apples, cider and 1/2 cup sugar. Bring to a rolling boil. Lightly cover the pot, allowing some steam to escape and boil for approximately 20 minutes, stirring often until the apples are tender and most of the liquid has evaporated.
Next, carefully place hot apple mixture into a blender (half-full) and process until mixture is smooth. Repeat as needed to process all of the hot apple mixture.
Now it’s time to return mixture to pot and stir in cinnamon, cloves, and the remaining sugar. Bring to a boil and reduce heat to low and simmer uncovered for 10-20 minutes until thickened. Let it cool before placing in an air tight container. If it seems runny, know that the mix will continue to thicken as it cools.
Once the apple butter has cooled, it can be stored in the refrigerator for up to two months It can also be frozen as well for even longer storage. Here’s to making your own apple butter this fall from fresh apples!
If you do happen to have a few apple trees, remember, as winter arrives, it’s time for pruning! See: Pruning Apple Trees In Winter – How & Why To Prune Your Trees When It’s Cold!
Follow Our Facebook Page For Great Gardening Tips And Advice! This Is My Garden Facebook Page
This Is My Garden is a garden website created by gardeners, for gardeners. Jim and Mary Competti have been writing gardening, DIY and recipe articles and books and speaking for over 15 years from their 46 acre Ohio farm. They publish three articles every week, 52 weeks a year. Sign up today to follow via email, or follow along!
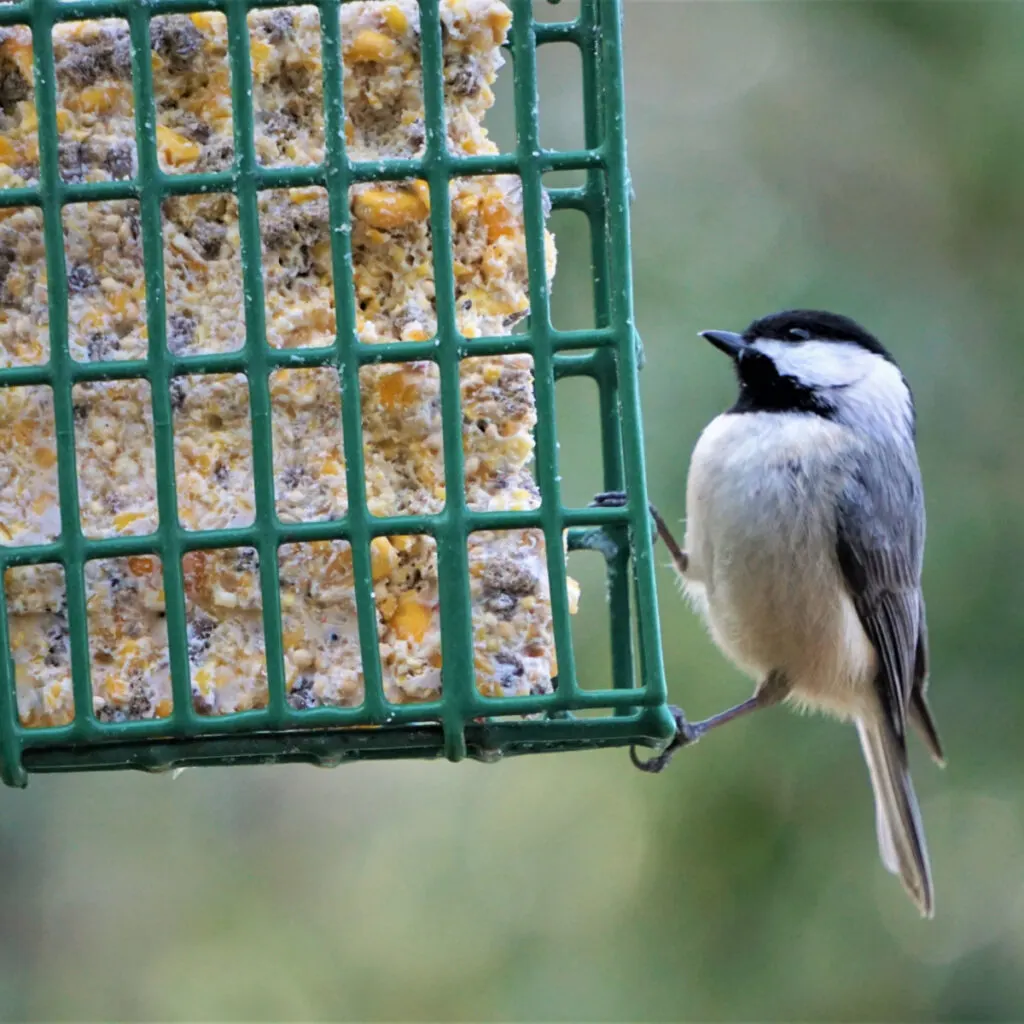
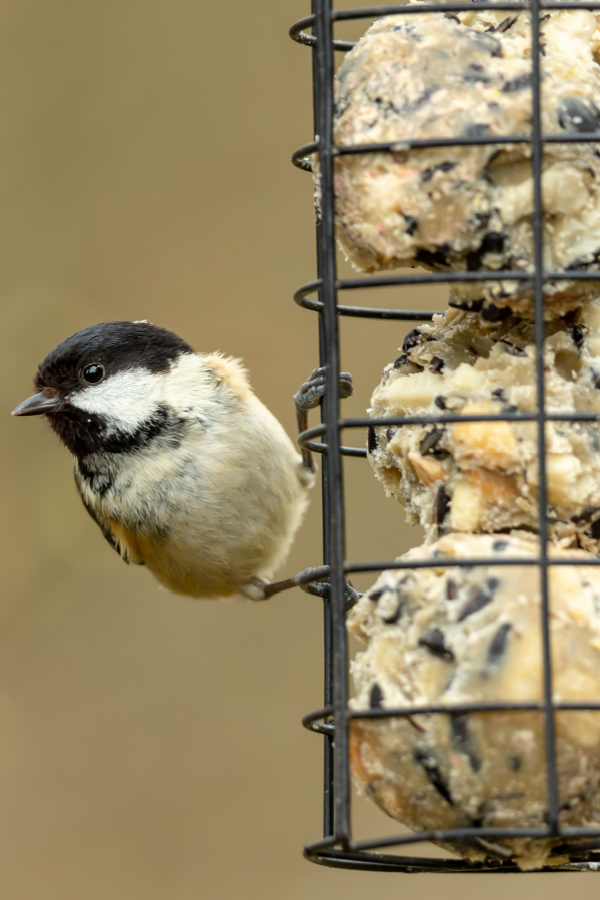
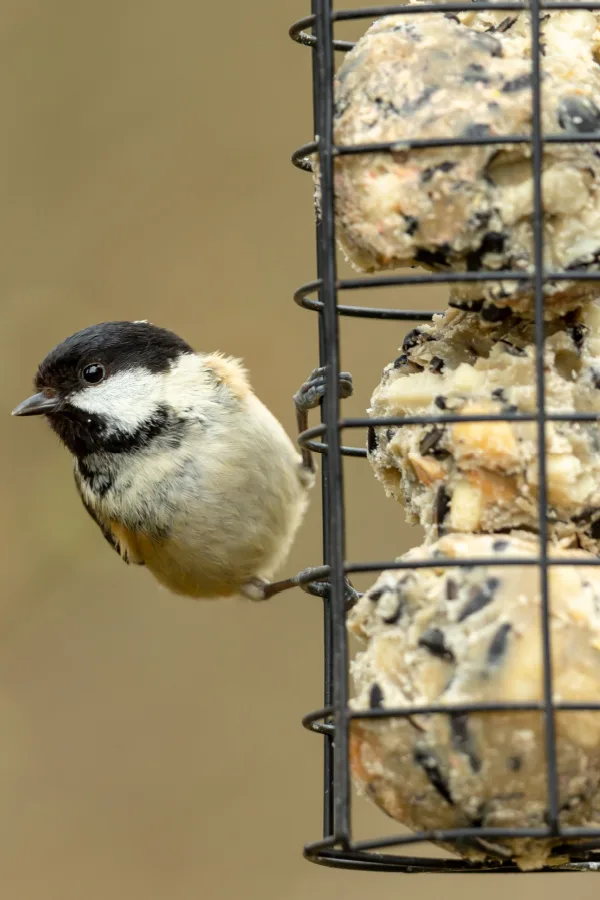
If you are looking for a simple way to feed and watch birds this fall and winter in your backyard – making homemade bird suet is a great, inexpensive way to do it! Not only will it have all kinds of beautiful birds visiting your landscape, you will also be helping them survive with an incredible source of nutrient-filled food!
During the fall and winter months, it can be difficult for birds to find enough resources to sustain themselves. Unfortunately, most of their natural food sources dwindle during the barren, winter months. And yet, their bodies still need energy and a lot of calories in order to survive.
Most of the insects and bugs that birds feed on during the spring and summer months have left or have gone into hiding. And, many of the plants that provide birds with a steady supply of seeds, nuts, and berries have died or mowed down as well.

While you can go to your local big box stores and purchase bagged birdseed or molded suet cakes, making it right at home is a great alternative. Not only is it less expensive, but homemade suet is free from dyes and preservatives, providing an even healthier source of food for hungry birds.
So whether you are looking to save a little money, want a family-friendly project to tackle, or simply want to help out your feathered friends, here is a look at how to make your own homemade bird suet with ease!
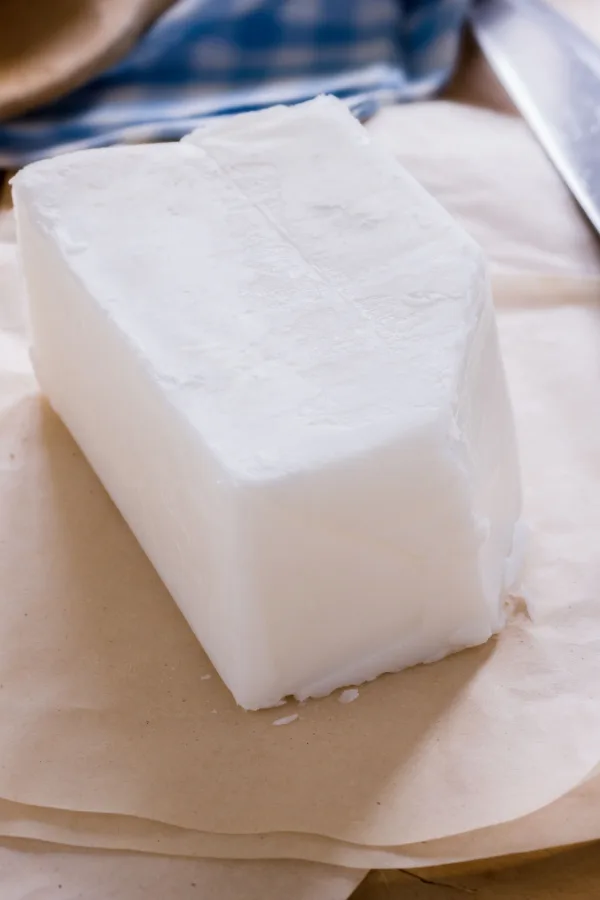
So what is suet? In its pure form, suet is animal fat that has been rendered into shapes and blocks. Suet is most often made from beef fat, although you can use other types of fats as well to create it.
Suet is incredible as a food source. It is high in calories and a great meal for hungry birds, especially during the colder winter months. Suet is typically combined with seeds, nuts, fruits, and other bird-friendly treats. This not only helps to make it more appealing, but also more nutritionally dense for hungry birds.

Not all bird species like suet, but there are many overwintering species that do. Species like cardinals, chickadees, jays, nuthatches, orioles, starlings, woodpeckers, and wrens all enjoy consuming suet treats.
One thing is for sure, suet really can help make a big difference in keeping a wide variety of birds healthy, strong, and most importantly, alive through the barren winter months. The high fat content is ideal for providing warmth. See: How To Help Birds Survive Winter
The good news is it’s easy to make. And it’s also simple to adjust individual suet recipes to attract specific bird species.
Bird suet is made up of a few simple ingredients that can all be found quite easily at your local grocery. Those ingredients include shortening or lard, crunchy peanut (or any nut) butter, oatmeal, cornmeal – and your choice of a few additional treats that can be anything from dried fruit to oats or birdseed.
The recipe below is a great all-purpose starter suet. From there, you can adjust ingredients based on what the birds feeding at your feeders like most.
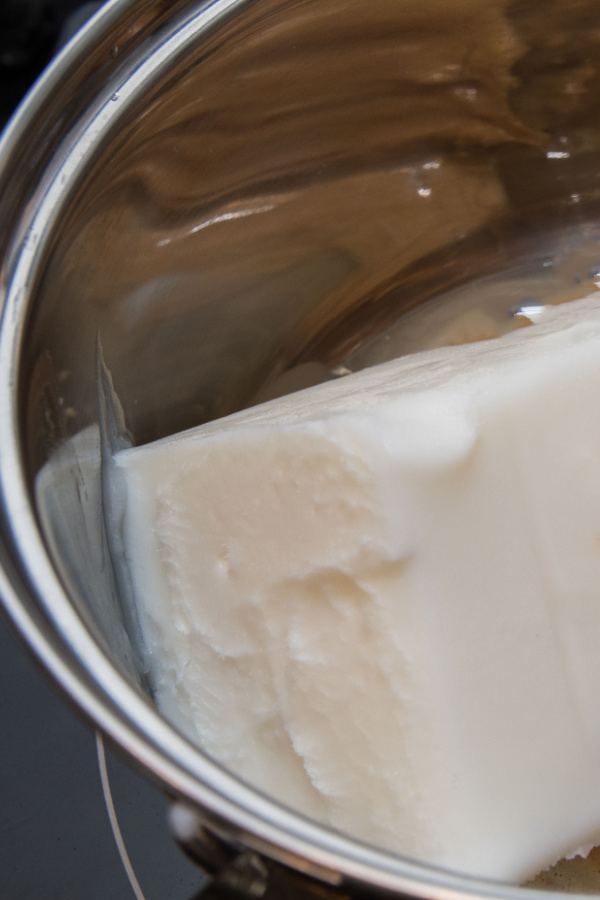
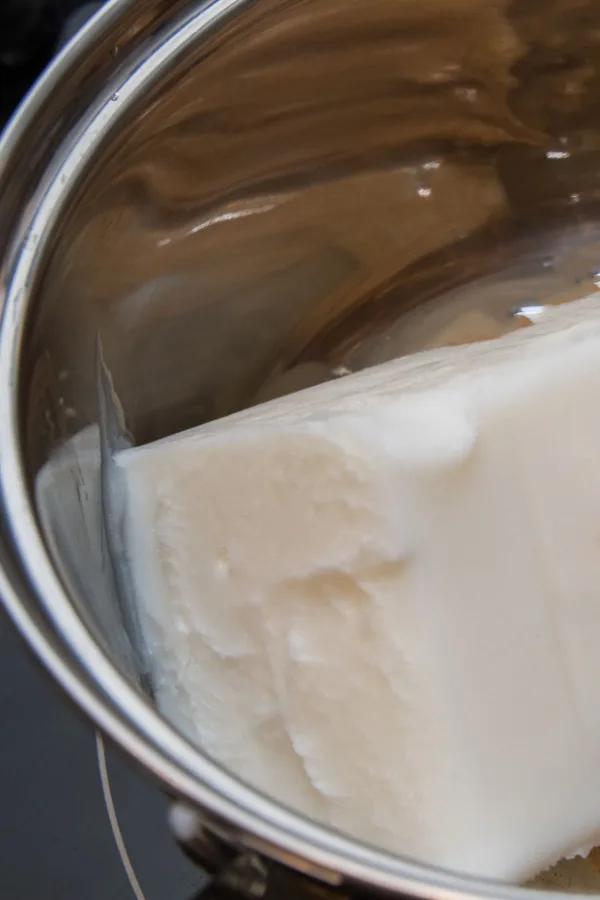
The first step is to cut the fat into small pieces. This will help it melt more quickly and evenly. Place the pieces into a heavy saucepan and heat them over medium-low heat. Continue to stir until all of the fat melts completely and the mixture liquefies.
Do not let the mixture come to a boil or allow it to burn. Stirring frequently will help greatly in preventing this. If using animal fat, this is the time to sift out any large pieces of meat, bones or other tissue as it melts.
Next, remove the pan from the heat and pour the liquid through a cheesecloth or fine mesh strainer. This helps to remove any tiny contaminants from the liquid. Repeat as needed, reheating the mixture if it starts to solidify.
Once you have strained the melted fat, it’s time to mix all of the other ingredients together. This is done without heat. Start by mixing in the peanut butter and stir well. Then, add the remaining ingredients and mix thoroughly.
Now it’s time to put your suet mix into molds. You can use any type of small container as long as you can easily remove the solidified suet. You can also pour the mixture into a large container and then cut it into smaller pieces after it sets.
The real key when making suet molds is to make sure your molds or cut pieces will fit in whatever suet feeders you are using. (More on suet feeders in a moment)
Place your suet containers in the refrigerator or freezer to harden. Once the suet sets, remove the pieces from their molds and store them in freezer bags or containers with seals. The suet will last up to a year if kept in the freezer. You can then simply remove the amount you want to use as needed.
You can find feeders made specifically for holding bird suet in stores or online. You can also be creative and make your own suet feeder.
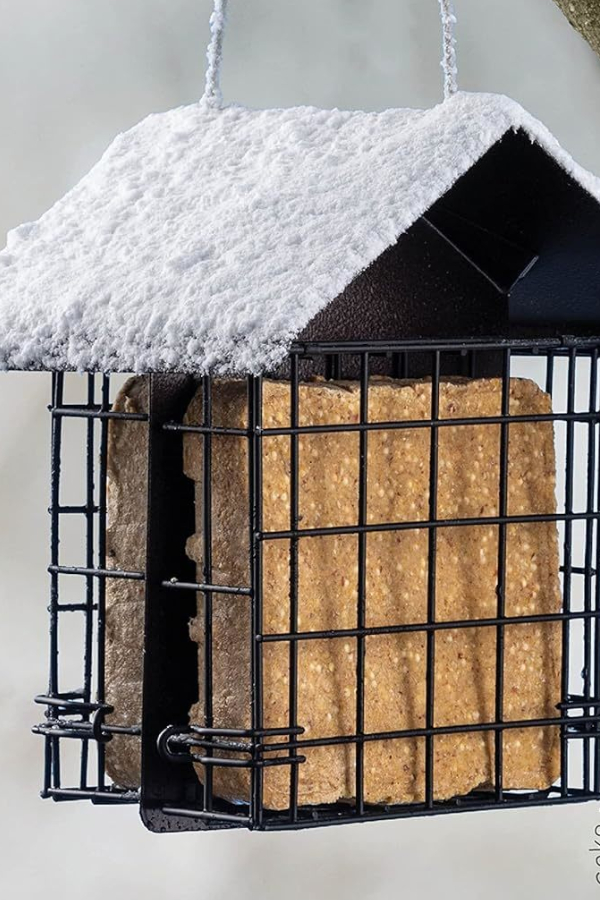

Choose or make a feeder that has some sort of roof overhead. It’s also best to place the feeder in a location that is well protected from the elements. Keeping the bird suet out of the rain and snow will allow it to last much longer. (Affiliate Product Link: Suet Bird Feeder With Roof)
Other hungry animals like raccoons, mice and squirrels also enjoy homemade bird suet. For this reason, keep your feeders high off of the ground and use some type of baffles for additional protection.
Because suet is an animal byproduct, it will eventually mold, spoil and become rancid. Especially if it gets extremely warm outdoors. If temperatures rise above 70º Fahrenheit, the suet is more likely to melt or spoil more quickly.
With this in mind – it is best to use homemade suet only during the colder fall and winter months. Of course, this is when the birds most need the extra calories due to a lack of food sources and the cold temperatures.
It is best to use only a small amount of bird suet at a time. If you notice that the birds are landing on the feeder but then quickly leaving, check to see if the suet is spoiled and replace it with a new piece as needed.
Here is to making your own homemade bird suet – and to helping birds survive the long winter ahead!
Follow Our Facebook Page For Great Gardening Tips And Advice! This Is My Garden Facebook Page
This Is My Garden is a garden website created by gardeners, for gardeners. Jim and Mary Competti have been writing gardening, DIY and recipe articles and books and speaking for over 15 years from their 46 acre Ohio farm. They publish three articles every week, 52 weeks a year. Sign up today to follow via email, or follow along!
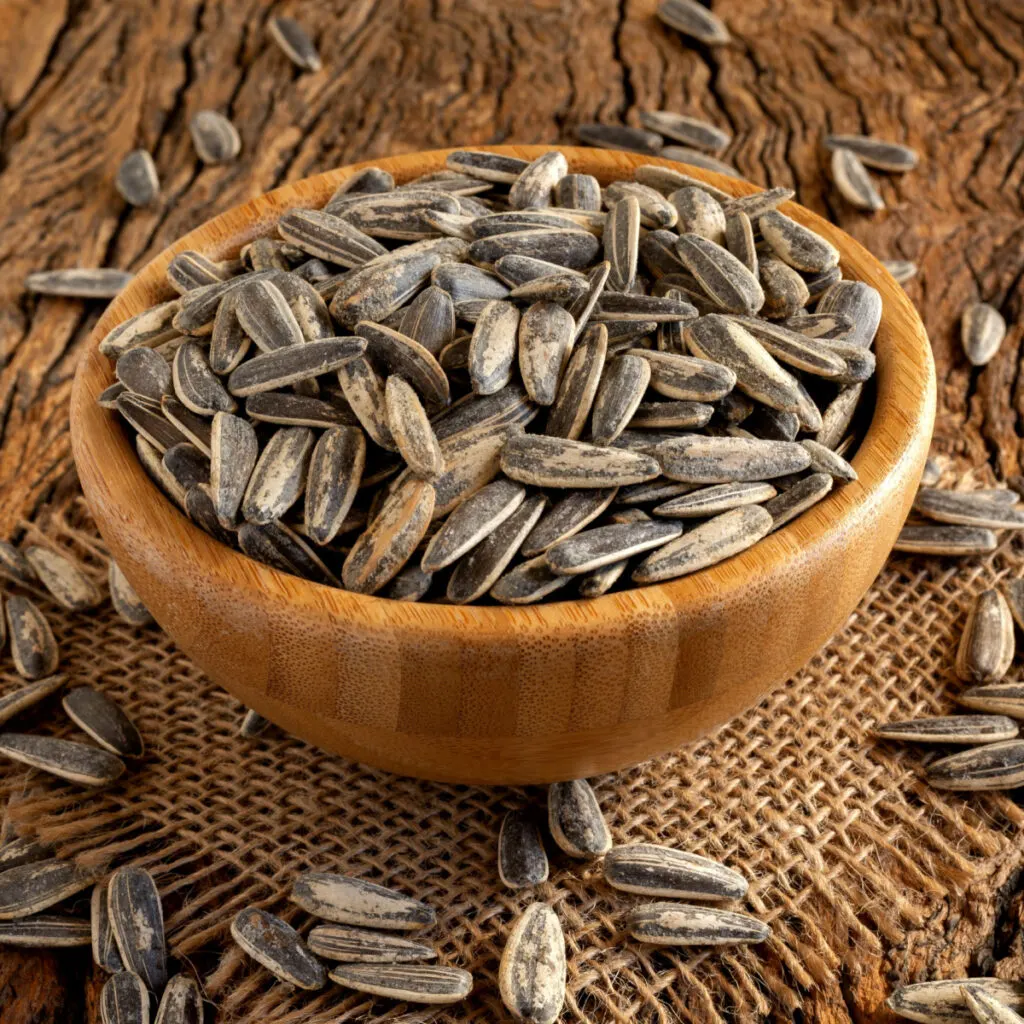
Looking to know when it’s the perfect time to harvest your sunflower seeds from your plants? Whether you want to save seeds for future planting, keeping them to use for bird feed or planning to roast the seeds to enjoy them for yourself – there’s nothing quite like growing and harvesting your own sunflower seed crop!
There’s no doubt that sunflowers are one of the easiest and most helpful plants to add to your garden and landscape. Not only are they great for for attracting pollinators, they also bring tons of color and interest with their massive bright blooms.
But it’s what these sunny flowers produce after their blooms start to fade that is the real winner! Sunflowers produce tons of seeds that can be used to feed animals, birds, and of course, humans. What’s more, you can even harvest the seeds to use for planting again the following year, making growing them entirely free!

So if you happen to have a few sunflowers growing in your backyard, here is a look at how to know the right time to harvest them, and what to do with those big flowering seed heads once you do!
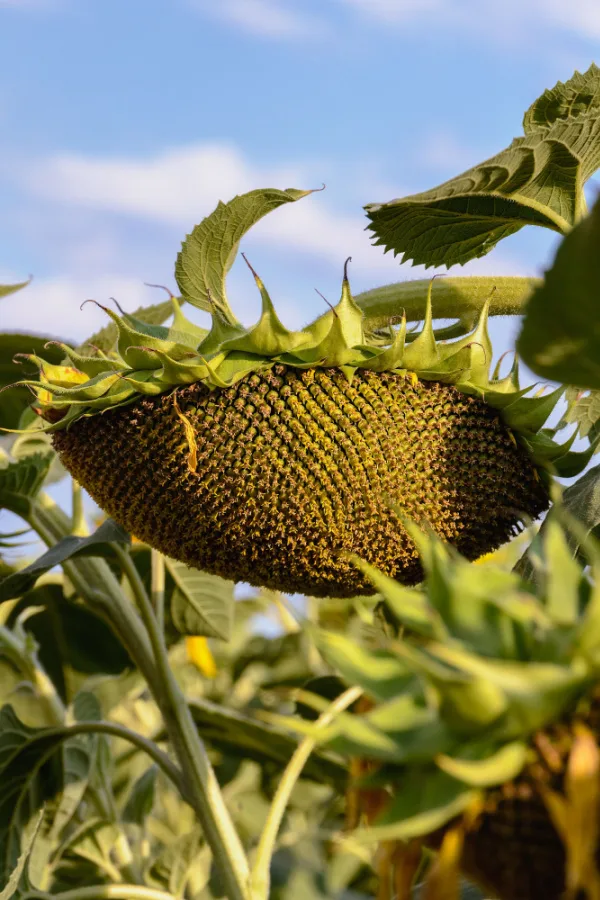
Sunflower blooms are made up of a row of fake petals that surround the actual seed head. While these petals have nothing to do with pollination or the creation of the seeds, they do help in indicating when it’s time for harvesting.
Once you start to see these false petals fade and die off, it’s the first signal that the time for harvesting is getting close. Not long after this, the entire seed head will begin to look dull. In addition, the seed head will also begin to hang downward as opposed to pointing toward the sky.
When all of these occur, it’s time to take a look at the back of the sunflower. It is here on the back that you will find the best indicator of all for knowing when it’s time to harvest. The back portion of the sunflower is called the calyx. During the spring and summer, the calyx is typically a bright green color as the sunflower grows and matures.

But when the back starts to turn a brownish, dark yellow color, it’s a signal that the plant is no longer sending energy and resources to the bloom. And it’s exactly at this point that you can start harvesting the seed head!
It’s important to note that you do not have to harvest the heads from sunflower seeds to dry them. You can actually leave the seed head on the stalk to dry naturally, but it can make it easy for birds, squirrels, and other animals to get to the seeds first and devour most of the crop.
Because of this, cutting the seed head from the stalk as soon as the flower head begins to show the above signs of maturing is best. Not only will it keep the seed safe, but it can also help them dry out far faster.
Start by cutting the flower head from the main stalk, leaving about 6 to 8 inches of stem attached to the head. Next, remove any leaves and petals. This includes the tiny true flowers that are attached to the seeds. By removing the leaves, petals and little flowers, the seeds can will dry out much quicker.

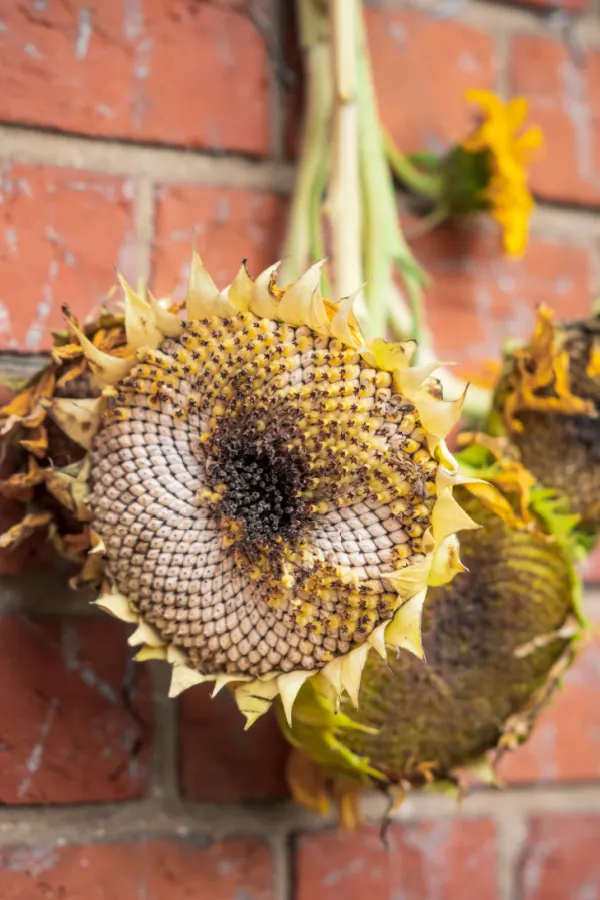
Once all are removed, hang the seed heads upside down in a protected, dry area. Once again, if not protected, they can be an easy meal for hungry wildlife. In addition, if the get wet from rain, it can delay the drying process or even cause them to mold.
As an alternative to hanging, you can also place the seed heads on a wire rack that provides adequate airflow. No matter where you dry it, the key is to allow air to get to as much of the seed head as possible.
Allow the seed head to turn dark brown and dry out completely. This typically takes around 2 to 3 weeks. It will vary depending on the size and condition of the seed head – and how much air flow and humidity are present as well.
Whether you let the seed heads dry naturally on the stocks or cut them off, the process for removing the seeds is identical once they are dry.
Begin by scraping off any remaining chaff and petals that are on top of the seeds. Next, hold the seed head over a large bowl or 5-gallon bucket. Carefully remove the seeds with your fingers. Be sure to wear gloves since this process can be a bit rough on your fingertips, especially if you have a lot to harvest.
An even quicker way can be to take two seed heads and rub them against one another. The friction will quickly and easily remove most of the seeds from both sides, saving your fingers in the process!
Once your seeds are dry, what you do with them at this point will all depend on how you want to use your seeds in the future.
If you decide to save your sunflower seeds for planting, allow the seeds to dry out in a single layer on a baking sheet or drying rack. The seeds need to be completely dry before storing so they don’t become spoiled or germinate prematurely.
Once dry, store them in a sealed plastic or glass container until it’s time for planting. It is best to keep them in a cool but drier area of your home. If they get too much humidity or heat, it can severely impact the seed quality and keep them from germinating the following year.
If you plan on consuming the seeds, it’s best to roast your sunflower seeds first. While you can enjoy your seeds raw right away, most people prefer the flavor of roasted seeds better. It’s a simple process, but one that makes a big difference in the overall taste of the seeds.

There are two main methods for roasting: unsalted seeds or salted seeds. It is purely a matter of personal preference for roasting. Here is a look at both:
Begin by preheating your oven to 300º Fahrenheit. Rinse the sunflowers off and pat them dry. Next, spread the seeds out on a large cookie sheet in a thin layer.
Place the cookie sheet in the preheated oven on the center rack and roast them for 35 to 40 minutes or until the shells turn slightly brown. When they have been roasted long enough, the seeds should crack open easily down the middle.
While the salted version takes a little bit longer, the results are well worth the extra step when it comes to flavor. Begin by soaking the seeds overnight in a solution of ¼ cup of salt and 2 cups of water. You can double the solution as needed so that all the seeds are completely submerged in the liquid.
In the morning, preheat the oven to 300º Fahrenheit. Drain off the water but do not rinse the seeds. Place them in a thin layer on a cookie sheet and allow them to dry out slightly.
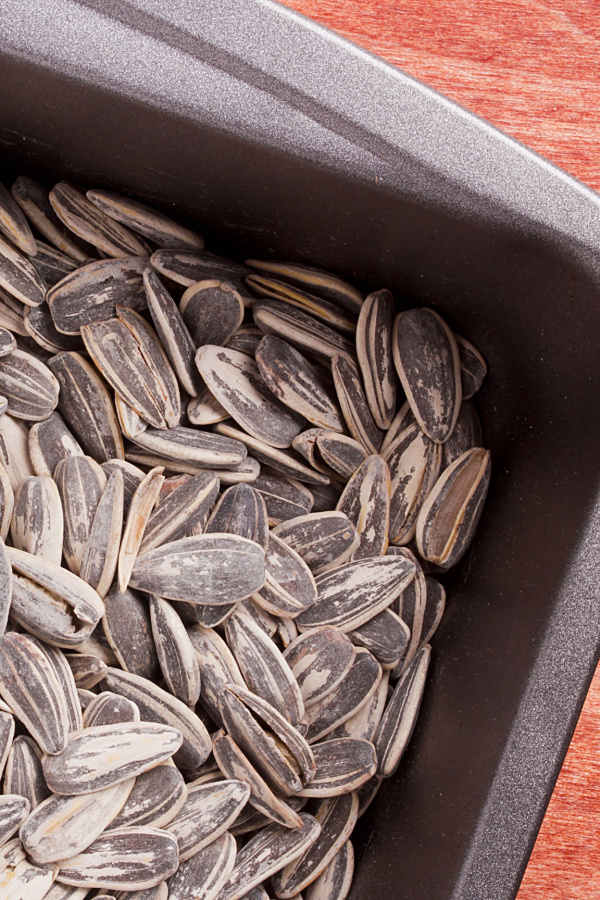
When mostly dry, place the cookie sheet on the center rack in the oven. Roast the seeds for 35 to 40 minutes or until the shells are slightly brown. Whether you are making salted or unsalted sunflower seeds, you can store them in an air-tight container and they will keep for several months.
When choosing your sunflower varieties at the time of planting, you do want to consider what your end goal is. Not all sunflower varieties are best for eating.
Some varieties that are oily seeds are best for feeding wildlife or turning into sunflower oil. These types are not the best for consuming for humans as seeds. See: Homemade Bird Seed – How To Make Nutritious, Low-Cost Feed At Home.
If you want sunflower seeds for eating, look for varieties that have stripes or feature “best for raw eating or roasting” on the seed packet. Mammoth Grey Strip is one of the best choices for growing to create delicious roasted seeds. (Affiliate Product Link: Mammoth Grey Strip Seeds)
Here is to growing, harvesting and enjoying sunflower seeds. The best part is that once you invest in your first seeds – you can grow for free year after year!
Follow Our Facebook Page For Great Gardening Tips And Advice! This Is My Garden Facebook Page
This Is My Garden is a garden website created by gardeners, for gardeners. Jim and Mary Competti have been writing gardening, DIY and recipe articles and books and speaking for over 15 years from their 46 acre Ohio farm. They publish three articles every week, 52 weeks a year. Sign up today to follow via email, or follow along!


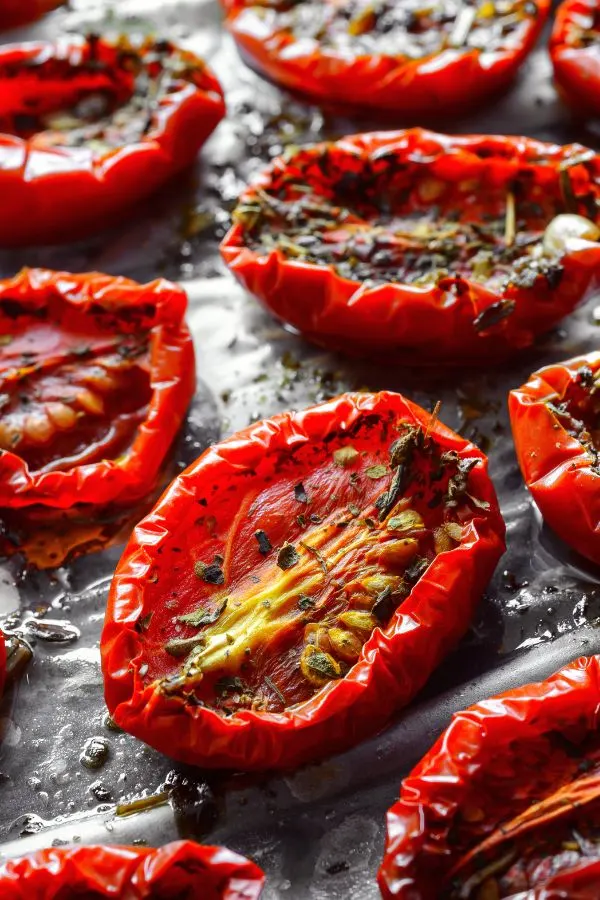
Looking for a simple method using your oven to make sun dried tomatoes from the fresh tomatoes growing in your garden this summer?
Harvesting fresh, ripe tomatoes from your garden and turning them into sun-dried tomatoes has a certain magical quality. Being able to concentrate and save the fresh taste of summer the whole year round really is special.
The good news is that when it comes to preserving tomatoes – it honestly doesn’t get much easier than creating delicious sun dried tomatoes in your oven. And when dried, the super sweet flavor of the tomatoes rises to a whole new level. And can it ever add all kinds of amazing versatility to your meals, appetizers and more!
First, more than anything else, it’s important to pick the best of the best tomatoes before you start the dehydration process. Always be sure to select tomatoes that are firm, ripe, and meaty. Meaty tomatoes are not only thick and full of flavor, they also usually have far less seeds.
San Marzano, Roma, Grape and cherry tomatoes are all great examples of tomato varieties that are perfect for making sun dried tomatoes. All are meaty and sweet – and all typically produce an abundance of tomatoes throughout the summer months.
These features are essential for getting the best sun dried quality while in the oven. Because of their smaller size, the cherry and grape tomatoes have the added advantage of taking slightly less time in the oven.
Once you’ve chosen your preferred variety, it’s time to clean them. Gently rinse the tomatoes to eliminate any dirt and debris. With a fresh kitchen towel or paper towel, carefully pat them dry.

Next, cut the tomatoes in half. If they are small cherry or grape tomatoes, that is more than enough for drying in the oven. If using slightly larger varieties, cut into smaller but equal size pieces. Quartering or even cutting into eighths can usually produce the perfect size for dehydrating.
The next important step is to remove the seeds from the tomato slices before drying them. The watery membranes that surround the seed area holds a lot of moisture – and all of that excess water will greatly delay the oven’s drying effects.
With a tiny spoon or by using your finger, carefully scoop out the seeds and remove the core. Be careful not to harm the flesh while doing this step.
To pull out additional moisture, lightly sprinkle the tomatoes with salt. Give the salted slices roughly 30-40 minutes to sit. Blot them dry with a paper towel after they have rested. This technique will not only improve the flavor of your sun-dried tomatoes, it will also help the drying process to go smoother and faster.
Now it’s time to heat up the oven! Preheat to 225°F (107°C) – this “low and slow” temperature is always best for making sun dried tomatoes in the oven. The low temperature and longer cooking time may take longer to dry them out – but it is exactly what gives your tomatoes great flavor!
The tomatoes’ bright color and flavors are preserved by the low heat, which allows for a gradual drying process.
As we know, the tomatoes themselves are already crammed with flavor. This can more than make them fantastic on their own. Because of this, when considering adding additional ingredients into the mix, it’s important to keep it simple.
One option is olive oil. Once the tomatoes are cut side up on the parchment lined baking sheet, add a small drizzle of good quality olive oil. This small addition can add big flavor and can elevate the dish nicely.
Another potential choice is adding Italian seasoning. The fragrant mixture of basil, thyme and oregano is very complimentary to traditional Italian flavors. Again, don’t overpower with too many additional ingredients. With the dynamic flavor of the tomato, simple is always best.

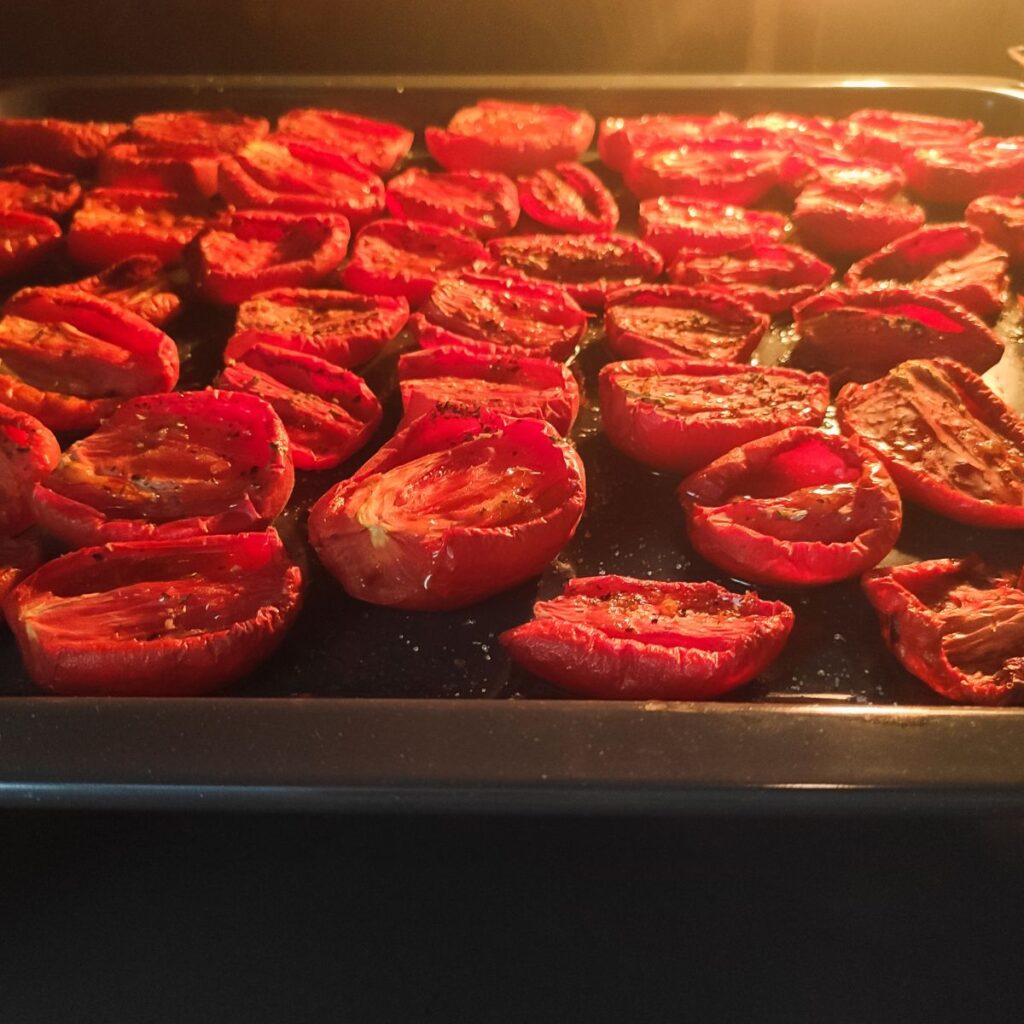
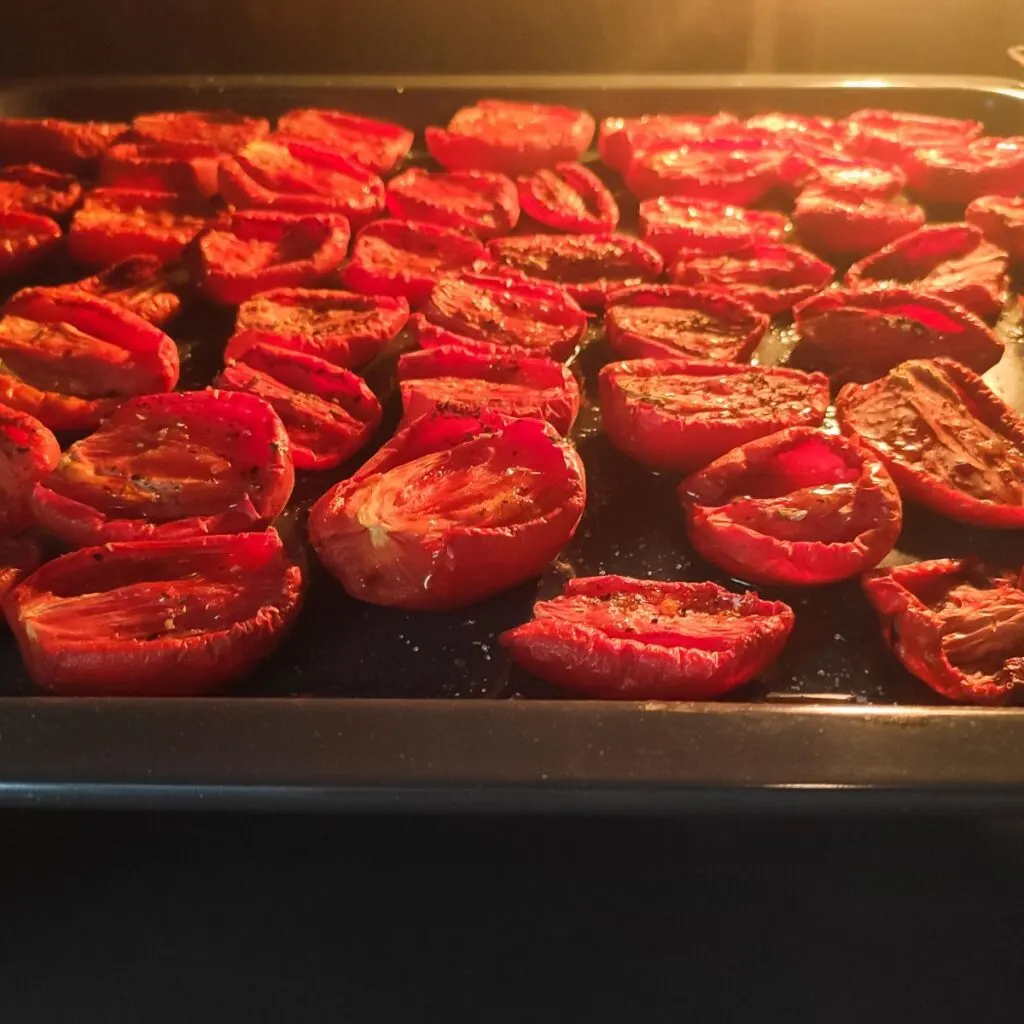
Now that your tomatoes are ready and your oven is preheated, it’s time to start drying. Begin by lining a rimmed baking sheet with parchment paper. Be sure none of your tomatoes overlap on the baking sheet. It’s very important to have one even layer.
In addition, leaving a little room between each slice will ensure a nice, even drying of all of the tomatoes. On average, the tomatoes should dry in the oven for 3-4 hours. Depending on the temperature of your oven and the thickness of the tomato slices, the drying time may change.
Because all of these factors vary, begin checking your tomatoes at the 2.5 hour mark. Continue to leave in the oven if you still see pockets of moisture and monitor frequently from outside the oven. Using the oven light helps to check when ready without letting the heat escape. When done, the tomatoes should look shriveled, leathery and dry.

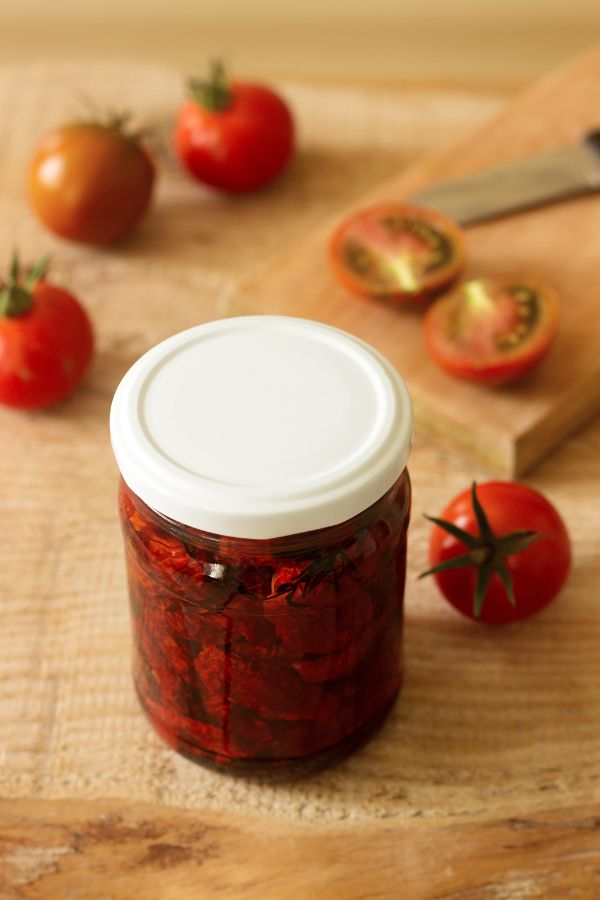
When the drying process is complete, carefully remove and allow the tomatoes to finish cooling on the baking sheet. Once the tomatoes are at room temperature, transfer them to an airtight container or a glass jar.
The tomatoes themselves can be kept in the refrigerator for up to 1-2 weeks. Adding a nice olive oil into the container before storing can make them last for an additional couple of weeks when refrigerated.
For longer lasting sun-dried tomatoes, freezing is the way to go. You can freeze them in a resealable bag or freezer container. When kept in a sealed container, frozen sun dried tomatoes can last for more than a year.
One thing is for sure, making sun-dried tomatoes in the oven really is a simple process. And while the ingredients are simple as well, the flavor is pretty extraordinary! The tastes and textures will certainly up the level of your dishes and add a nice touch of summer no matter the time of year.

So, if you happen to have extra tomatoes from your harvest this year – be sure to not let any go to waste. Indulge in the satisfaction of sun-drying your tomatoes in your oven, and enjoy a bite of summer every time you open them up. They even make great presents too!
For more great recipes from the garden, check out our garden recipe tab on the website! See : Garden Fresh Recipes
Follow Our Facebook Page For Great Gardening Tips And Advice! This Is My Garden Facebook Page
This Is My Garden is a garden website created by gardeners, for gardeners. Jim and Mary Competti have been writing gardening, DIY and recipe articles and books and speaking for over 15 years from their 46 acre Ohio farm. They publish three articles every week, 52 weeks a year. Sign up today to follow via email, or follow along!
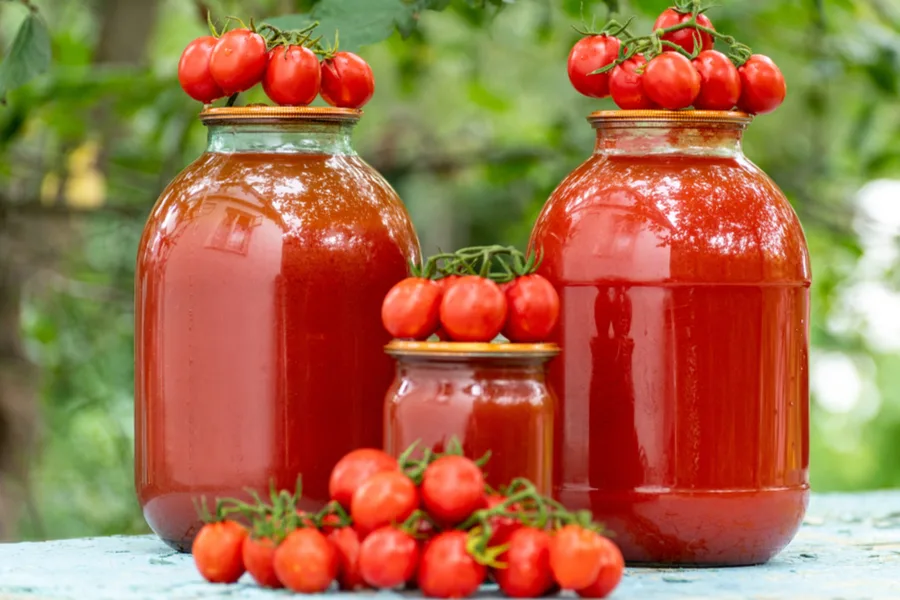
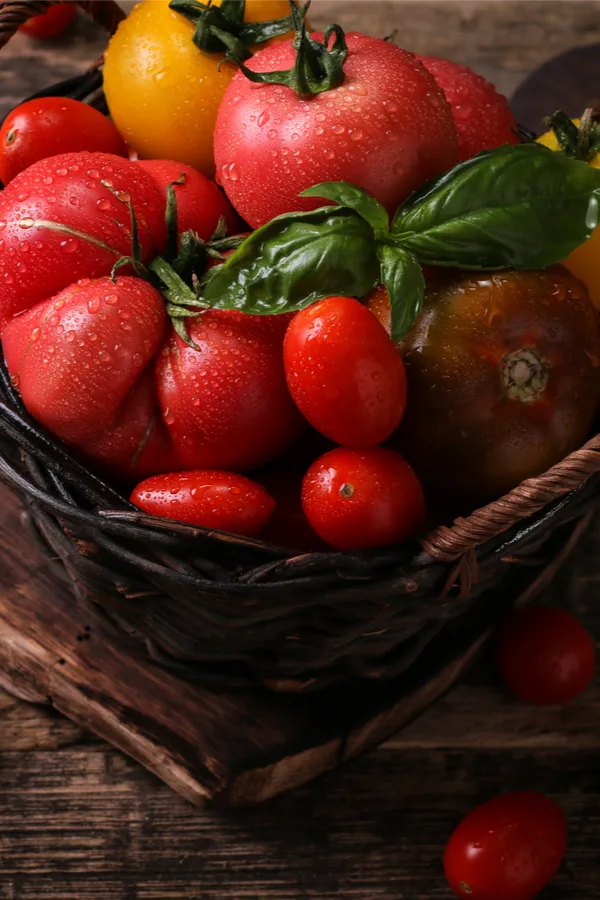
One of the easiest and most efficient ways to preserve your tomato harvest is to make and can delicious homemade tomato juice!
It is hard to beat the incredible taste of homemade tomato juice. Especially when it’s made from the tomatoes straight from your garden, or from fresh tomatoes from a neighbor or local farmer’s market. Not only is it delicious, it is also one of the most useful canning items to store in your pantry for year round use.
Tomato juice is refreshing and nutritious to drink all by itself. But it also happens to be the perfect ingredient for all kinds of dishes, soups, drinks & more!
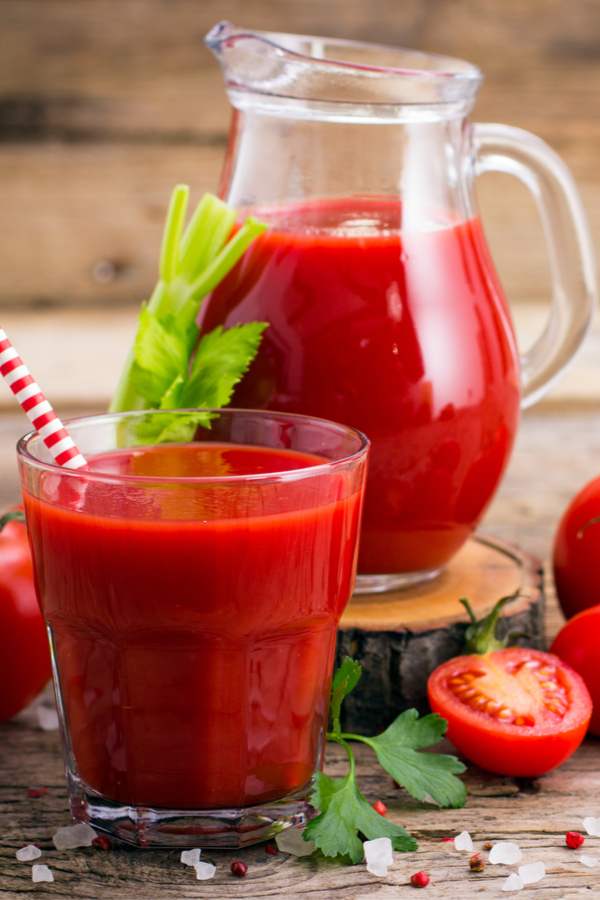

You can use tomato juice as a base for all types of soups – including chili, vegetable and plain old tomato soup! But it is also the ideal ingredient for adding flavor and moisture to casseroles, roasts, and more. And we certainly can’t forget it is the star of the show for an incredibly refreshing Bloody Mary!
One of the best things of all about making and canning homemade tomato juice is just how easy the entire process can be.
Preserving your own delicious tomato juice is one of the most uncomplicated canning recipes of all – making it ideal for those who might not have a lot of experience with canning, or have never even attempted canning at all.
Canning fresh vegetables can be intimidating to first timers for sure. But as you will see below, making and preserving your own tomato juice is a breeze. By simply following a few tried and true steps, you can safely and quickly turn a large harvest of tomatoes into wondrous juice.

And speaking of large harvests, making and canning tomato juice also happens to be one of the best ways to use and store an overabundance of tomatoes before they go bad. Especially when it comes to turning those seemingly endless cherry tomatoes into something useful!
With that in mind, here is a classic, tried & true recipe for making and canning delicious tomato juice from fresh tomatoes:
So how many tomatoes do you need to can a batch of tomato juice? It will all depend on the variety of tomatoes you are canning, but a good rule of thumb is that 25 pounds of fresh tomatoes will make around 6 to 8 quarts of juice.
To start, begin by washing and cleaning your tomatoes. Select only firm, ripe tomatoes for processing. Remove any small spots or blemishes with a knife. Avoid using tomatoes that are past their prime, or have anything more than a small blemish.
Using tomatoes that are in poor shape or have started to decay can be harmful to your batch. They often can contain bacteria that can spoil a batch – and there is nothing worse than having to throw away all of your hard work because of trying to save a few bad tomatoes!
Once they are clean, dice your tomatoes into small chunks. This will make the process of cooking them down go much faster. As a best practice, one-half inch chunks work well, allowing the tomatoes to cook down at a quick pace.

Dice enough tomatoes to fill a six or eight quart stock pot. Heat the tomatoes on medium-low heat, allowing them to cook down slowly. Cooking down too fast or at too high of a temperature can risk burning the flesh of the tomatoes at the bottom of the pot.
It is extremely important once heating has begun to stir the pot every 5 to 10 minutes. This will also help keep the tomatoes from sticking to the bottom of the pan and burning. As the tomatoes begin to cook down, there will be a bit more room in the pot to add in additional chopped tomatoes.
As the tomatoes cook, the level of juice and pulp will go down. When this happens, add more chopped fresh tomatoes to the pot to refill it to the top. Do this until the pot is nearly full of tomatoes that are partially cooked down. This will give you enough juice to can six to eight quarts of juice.
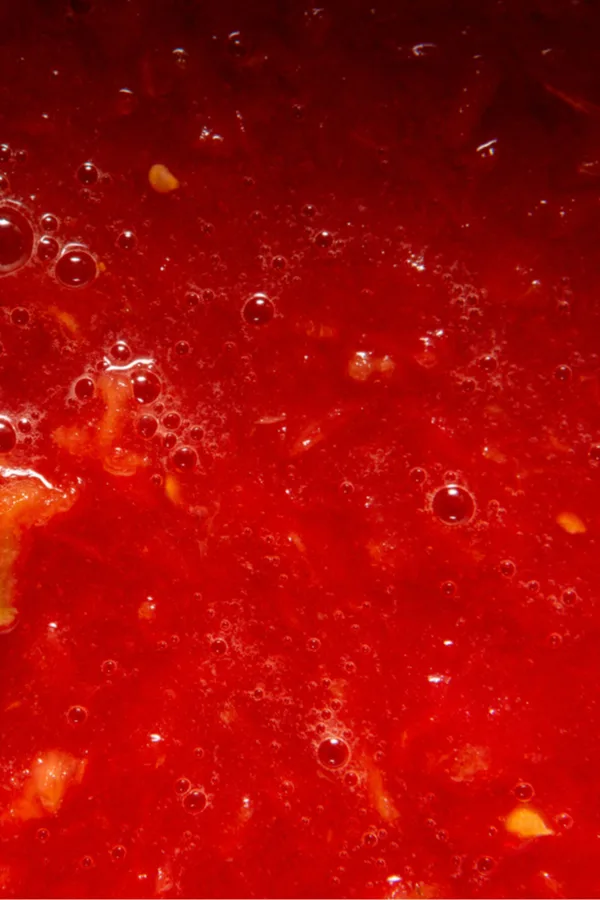
Now it is time to cook the pot of tomatoes down completely. They need to heat and cook down until the tomato chunks fall apart completely. This process can take anywhere from a half hour to an hour depending on the variety and overall ripeness of the tomatoes.
Once they have cooked down, it is time to remove the skins and seeds. If you have a tomato press / strainer or mill, it works wonders for removing and separating the seeds and skins quickly.

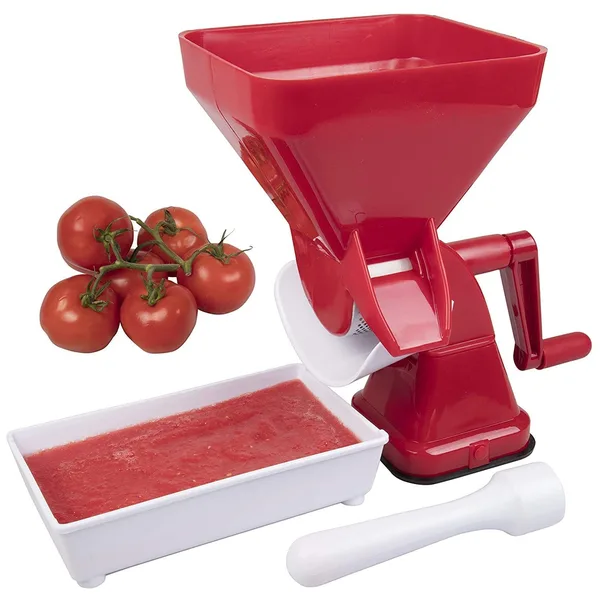
As another option, a food mill will do the job as well, just not as quickly. It is a bit slower than the tomato strainer, but certainly gets the job done. If you plan on making a lot of juice, the tomato press / strainer is a wise investment for sure. Product Link: CucinaPro Tomato Strainer
After separating the juice from the skins and seeds, place the juice back in a stock pot and heat on medium to medium high heat. Allow the tomato juice to heat to a slow, rolling boil. Once the tomato juice begins to roll, allow it to boil for a full 10 minutes. You are now you are ready to can!
You will need to sterilize your canning jars before canning. This keeps any bacteria out of the jars and keeps your tomato juice safe. Sterilize pint or quart jars by first running through your dishwasher. Next, heat the jars and lids in a separate pot on top of the stove.
Once heated, fill jars with the hot tomato juice, adding in one tablespoon of lemon juice per jar. The lemon juice helps to increase the acid level to a safe level. It will not affect the overall taste of your juice.
Fill each jar near the top, leaving 1/2″ of head space at the top of the jar. At this point, you can also add in a half teaspoon of salt per quart jar for taste. It is not needed for safety reasons, only for taste if desired. To finish, wipe the rim and seal with a warm ring and lid.
At elevations from 0 to 2000 feet, process quarts in a hot water bath for 45 to 50 minutes. Due to their smaller size, pints will need to process for 40 to 45 minutes. When pressure cooking, it will take 20 minutes for quarts, and 15 for pints with 6 lbs. of pressure.
If you live in a higher altitude than 2000 feet, you should consult with your local extension office or check with the Ball canning guide for proper times and pressure. When done, remove jars and place on a towel and let cool for 24 hours.
Check to make sure all jars are sealed by pushing on the lid. If the lid is down and won’t move it is sealed appropriately. If not, immediately place in your refrigerator and use within 2 weeks. The jars can then be safely stored and used as needed. At this point, the rings that held down the lids can be unscrewed and taken off.
For more of our garden fresh recipes – check out our RECIPE TAB on the website!
Follow Our Facebook Page For Great Gardening Tips And Advice! This Is My Garden Facebook Page
This Is My Garden is a garden website created by gardeners, for gardeners. Jim and Mary Competti have been writing gardening, DIY and recipe articles and books and speaking for over 15 years from their 46 acre Ohio farm. They publish three articles every week, 52 weeks a year. Sign up today to follow via email, or follow along!
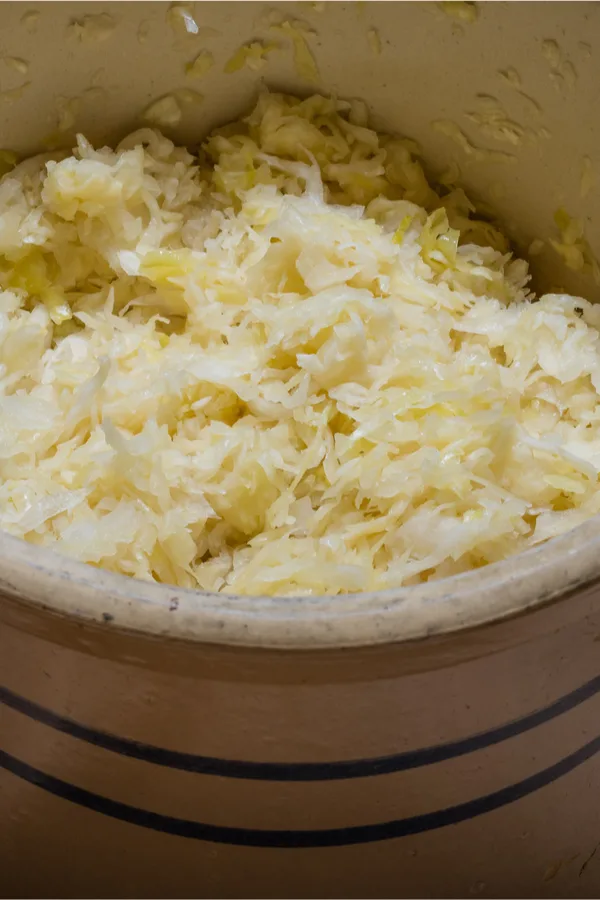
If you have a whole slew of cucumbers growing in your garden – it’s time to make an incredible batch of delicious, old fashioned pickles in a crock!
Crock pickles, often called barrel or jar pickles, are one of the easiest of all pickles to make. Not only is there no canning required, they can be prepared for pickling in mere minutes. Talk about easy pickle making!
But more than anything else, it is the taste that will have you creating these tasty treats every chance you get. The crispy, crunchy texture of crock pickles are hard to beat. So much so that although a big batch can last in the refrigerator for months on end, they will barely make it past a week before they are gone!


Pickles made in a crock are created through the process of fermentation. The method has been around for centuries, and is a safe and healthy way of preserving many foods.
When pickling through fermentation, a salt brine is used in place of vinegar. This gives the pickles a very light and airy taste compared to the more harsh flavor of vinegar based pickles. In addition, since the liquid is poured over the cucumbers at room temperature, it creates an ultra-crunchy pickle.
The process is quite simple and requires no refrigeration while the cucumbers pickle. It really is as simple as putting your cucumbers into a container and waiting for magic to happen!
As you will see below in the recipe, our favorite way to make these pickles is with a few hot peppers and garlic added to the mix. It gives the pickles a wonderful garlicky heat that is second to none.

The hot peppers do not create an overly spicy pickle, but just enough heat to add great flavor. You can certainly omit the garlic and hot peppers without affecting the pickles at all, as both are added purely for taste.
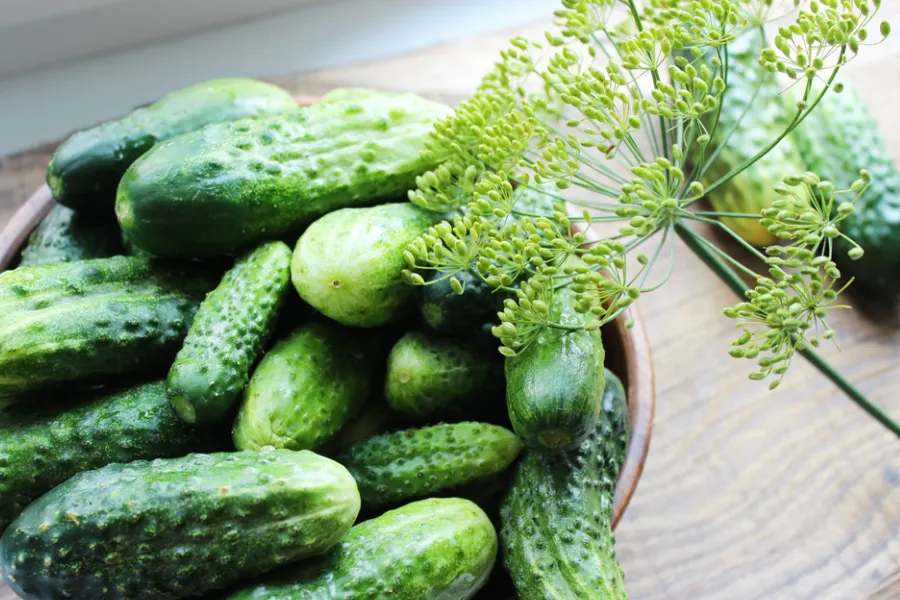
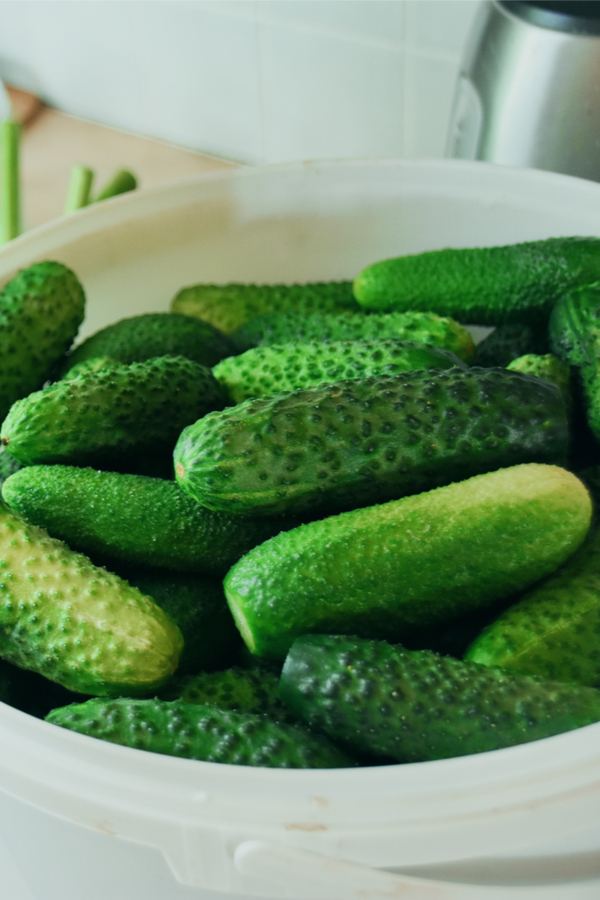
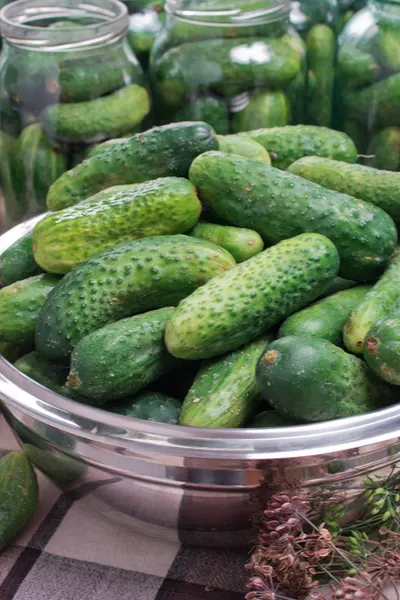
A good old-fashioned pickle begins with selecting the best cucumbers you can find. More than anything else, whether purchasing cucumbers at a market, or harvesting your own, starting with fresh, crisp cucumbers is the ultimate key to success.
Unfortunately, once a cucumber goes soft, there is no turning back. The fact is, if you start with an older or soft cucumber, you are going to end up with a soft and uninviting pickle.
It’s also very important to select the right type of cucumber for pickling! There are a multitude of cucumber plant varieties that are perfect for making pickles. Boston Pickling Cucumber, National Pickling Cucumber & Bushmaster are all at the top of the list. See: The 4 Best Cucumber Plants For Making Pickles


The cucumbers you select should be firm and without blemishes. As for size, try to select cucumbers that are between four and five inches in length with a stocky, blocky, middle section.
Do not attempt to ferment any pickles that have bruises or cuts. These can easily go bad and ruin the rest of your pickles in the process. Now, lets take a look at the recipe!
A classic stoneware crock makes the perfect container for fermenting. These were the vessels of choice in the old days for fermenting all kinds of food. We have included links below for the crocks, but you can also use glass jars, small barrels, or any other container that holds liquid and can be sanitized prior to use.
Large canning jars also work especially well for fermenting pickles. Although quart jars will work, it is best to use jars that are least a half gallon in size. It simply allows for more pickles and brine to work its magic.
The recipe below makes enough pickles to fill a one (1) gallon crock. It can be adjusted to create more or less, but be sure to keep the ingredients in identical proportions.
The most important part of all is to keep the ratio of salt water (brine) exact. You can omit the garlic or hot peppers if you wish, or add dill if you want to make dill crock pickles – but the brine needs to be used in the ratio provided to properly ferment the pickles
Here is what you will need to make the pickles:
If you would like to turn your cucumbers into dill-style crock pickles, you will need the following ingredients as well:
Begin by washing your cucumbers thoroughly in cold water. Do not use hot water as this can soften the skins. Next, place the pickles down in an ice bath for 15 to 20 minutes. The ice bath will help to crisp up the cucumber’s skin before going into the container.

Layer the bottom of your crock or container with pickles. As you fill your container, layer in the spices equally throughout. Every so often, place in a grape leaf as well.
For a (1) gallon crock, place 3 or 4 leaves throughout the crock as you add the pickles. The grape leaves are actually a wonderful, all natural way to help keep the pickles crisp. Horseradish leaves will also work for this process as another option.
There is no right or wrong method as you place in the ingredients. You are just simply trying to place them in evenly to help the flavors meld while the cucumbers ferment.
Now it is time to pour in the brine to get the fermentation process going. Before pouring in the brine, pack down the cucumbers one last time to get them to fit as tightly as possible. Do not crush the cucumbers, but make sure to pack them in as firm as possible.
To make your brine, dissolve (6) tablespoons of salt into the half gallon of water. Although you can use many salts, we prefer to use Kosher salt – not only for the flavor, but for the way it dissolves and really absorbs into the pickles as a brine.
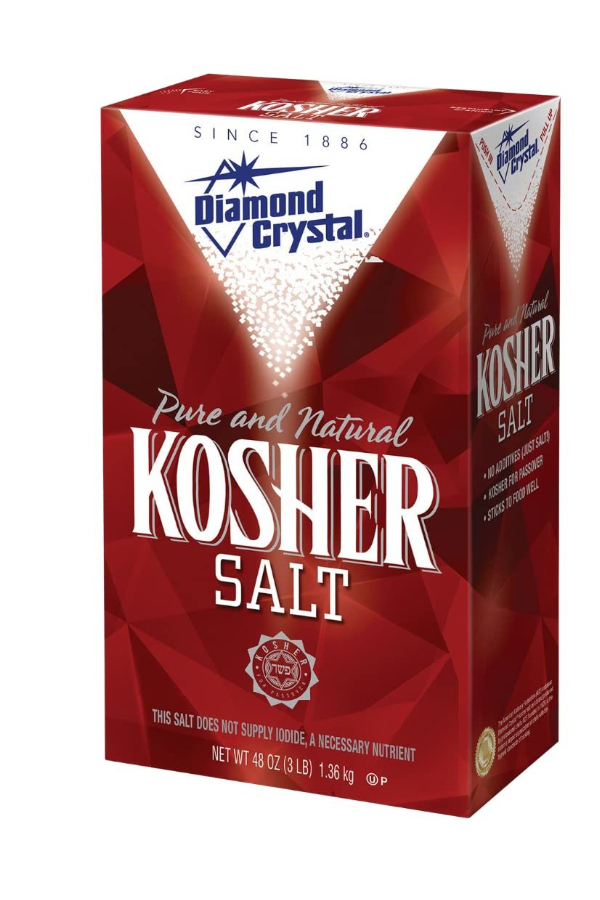
Whatever salt you use, be sure it does not have additives or anti-caking agents. These agents can interfere with the pickling process and compromise the batch. Product Link : Diamond Cyrstal Kosher Salt
Once the brine is ready to go, slowly pour it over the cucumbers. Fill the crock or container full of liquid so that it covers the cucumbers completely with at least an inch of coverage. Now it is time to weigh down the cucumbers and get the crock to a cool, dark place to ferment.
Weighing down the pickles down with a weight is one of the most important steps in the process.
The weight needs to go on so that the cucumbers can’t reach the surface – and more importantly, get air to them. Keeping them submerged is the key to success as it prevents the cucumbers from molding or spoiling.
Weighted crock stones are wonderful for this, but you can also create your own homemade weight with a plate and large stone or brick. Once your weight is in place, cover the top of the crock or container with a clean dish towel. This will keep any gnats or pests from flying into your brine.
Place the container in a cool, dark place to begin the fermenting. Keep out of direct sunlight and extremely hot or humid areas. This can lead to evaporation of the liquid and also make spoilage much easier.
It will take about 3 to 5 days to get your pickles to the point where they can be ready to consume. It really comes down to a matter of personal preference and taste.
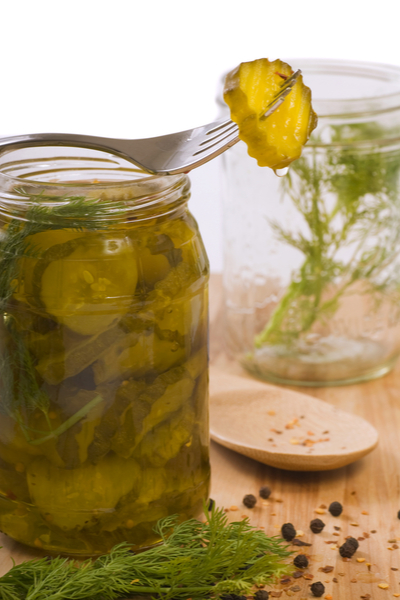
Once you have your desired flavor, you can store the pickles in your refrigerator for up to 4 months with ease. You do not have to store in the crock. You can instead store in clean containers and simply pour the brine over the pickles.
That’s it! It really is that easy! Here is to making delicious old fashioned pickles in a crock this year, and to discovering real pickle flavor.
Follow Our Facebook Page For Great Gardening Tips And Advice! This Is My Garden Facebook Page
This Is My Garden is a garden website created by gardeners, for gardeners. Jim and Mary Competti have been writing gardening, DIY and recipe articles and books and speaking for over 15 years from their 46 acre Ohio farm. They publish three articles every week, 52 weeks a year. Sign up today to follow via email, or follow along!
When it comes to making delicious treats from from fresh-picked garden vegetables, turning fresh-picked cucumbers into homemade dill pickles is certainly high on the list of favorites.
Cucumbers are the second most-planted home garden crop behind tomatoes. And quite certainly, making pickles is part of the reason they are so popular.
Every growing season, we try to pass on a few all-time favorite garden recipes. Such was the case last year with Granny’s famous Southern Ice Box Pickle recipe last year. In fact, it turned out to be a big favorite for many.
So with that in mind, we’ll keep the pickle recipe theme going this year with a classic, crunchy dill pickle recipe
This recipe makes approximately 3 to 4 pints. It can be adjusted in equal portions to create the quantity desired.
As with any home canning, always begin by washing and sterilizing your jars. Be sure to keep them hot prior to filling for the water bath method.

Before preparing your cucumbers, begin to heat the water bath so it is ready for your filled jars. Wash the cucumbers thoroughly, taking care to scrub the outer skin to remove any dirt.
Cut the ends from the cucumber and portion into slices, chunks or spears. Next, bring the vinegar, water and salt to a boil in a medium saucepan.
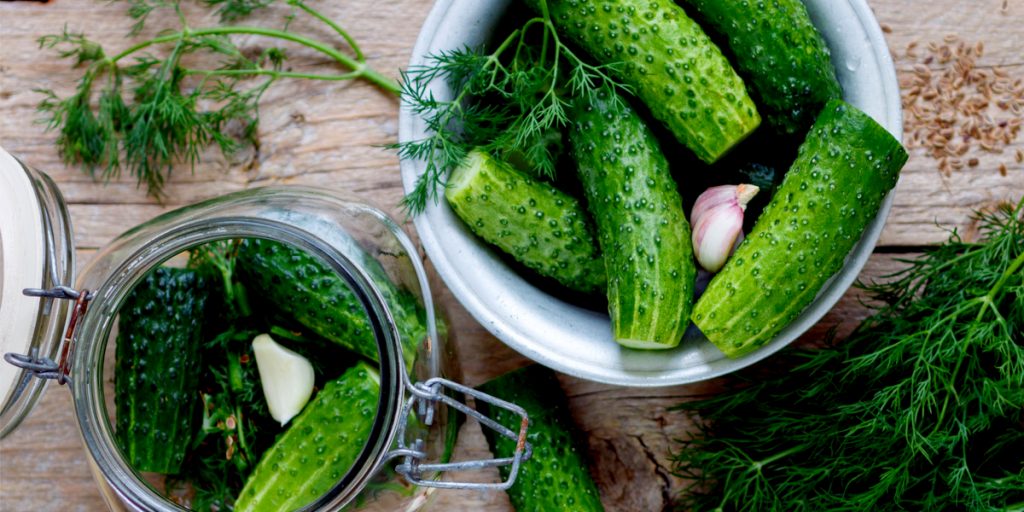
Now it is time to fill the jars! In the bottom of each jar, place a teaspoon of dill seed, 1/2 teaspoon of the peppercorns, and 1 garlic clove. Next, pack your cucumbers tightly into each jar.
Once the cucumbers are in tightly, pour the hot brine into the jar. Be sure to leave 1/4″ of head space at the top of each jar.
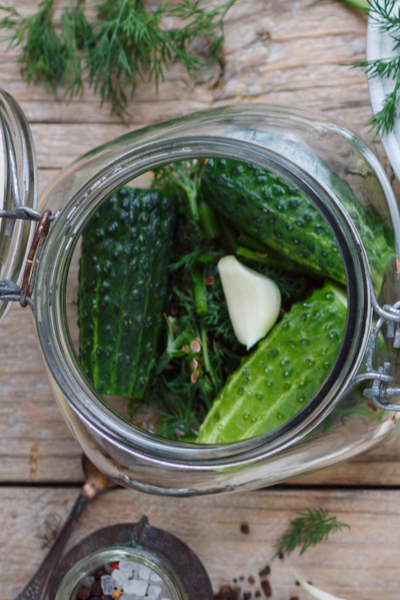

Next, insert a plastic knife around the inside of the jar to release any air pockets. To complete the jar packing, add 1/2 of a large grape leaf inside on the top each jar. The grape helps keep the pickles crisp once canned.
Finish by wiping the top of the jar off with a clean, moist cloth, then add the canning lid and screw on the band.
To can your homemade dill pickles, place the jars down into your hot water bath for 10 minutes at a rolling boil. (Timing will need to be adjusted for altitude, see: National Center For Home Preserving)


When the time is finished, lift jars from the canner bath with a jar lifter and place on a towel to cool for 12 to 24 hours.
Before storing, check to make sure the jars are sealed. To do this, simply press down on the center of the lid. If it doesn’t ‘pop’, you are good to go. If you are able to press down on the lid, refrigerate and use within a few weeks.

Although you will be eat the pickles right away, store them 2 to 4 weeks before opening. This allows the pickles to absorb the dill and seasonings to their fullest.
Be sure to check out our other straight-from-the-garden recipes on the Recipe Tab section on the website. And before you start planting, be sure to check out our article: The Top 3 Cucumbers To Grow To Make Pickles – The Perfect “Pickle” Plants To Grow This Year!
This Is My Garden is a website dedicated to spreading the love and knowledge of gardening around the world. We publish two new garden articles each week. This article may contain affiliate links.
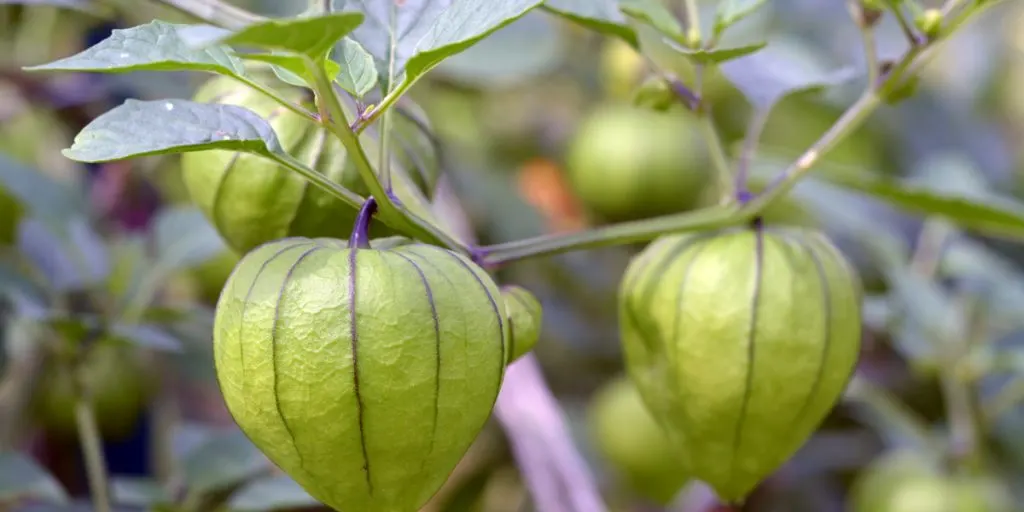
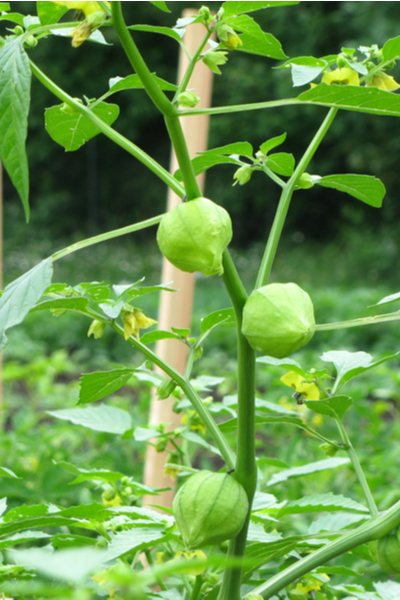
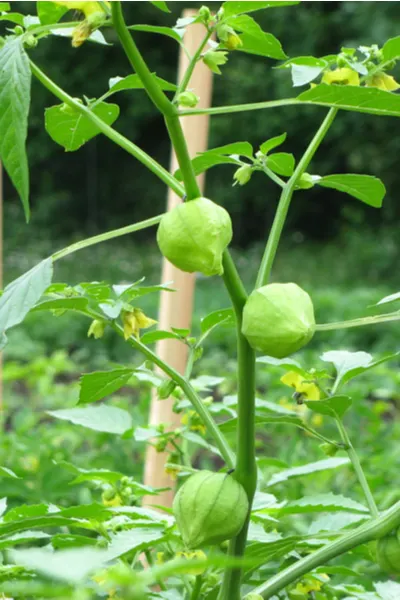
If you want to make some incredible homemade salsa verde, then make this the year you plant and grow delicious tomatillos in your garden!
Salsa verde has exploded in popularity. Along with it, so has interest in growing tomatillo plants in the garden or even in containers. And growing them is easier than you might think!
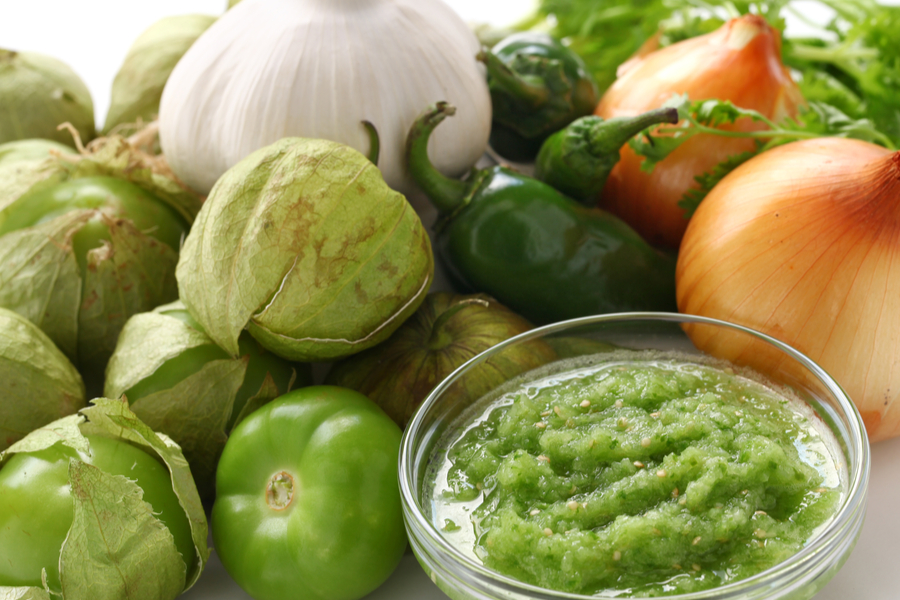
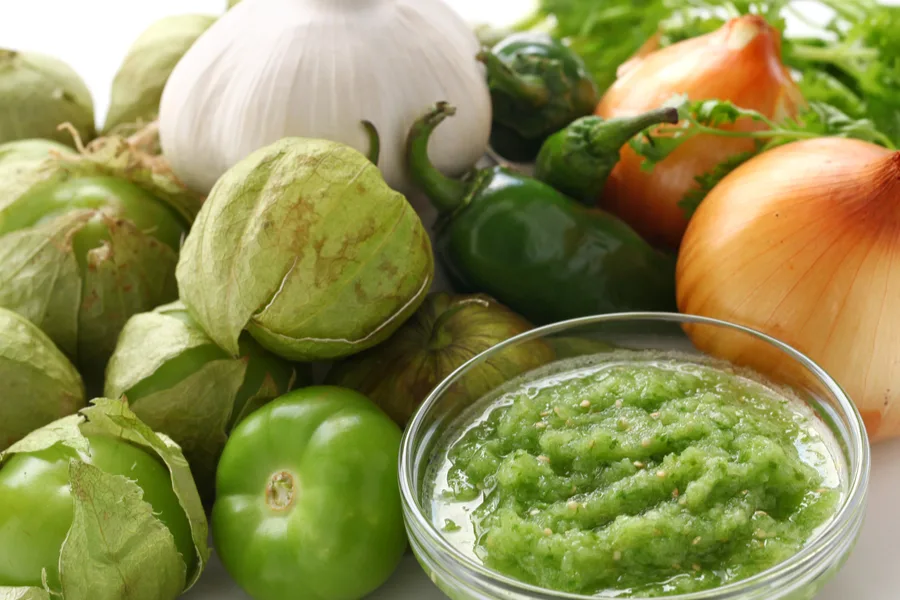
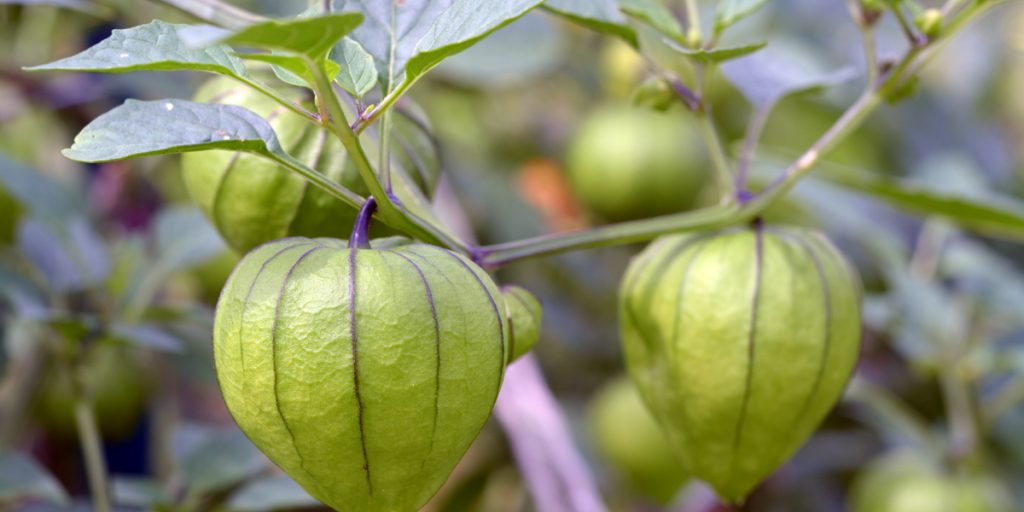
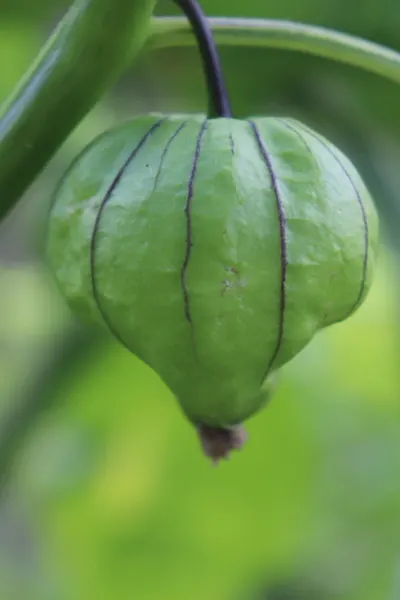
No, that tantalizing green salsa you love doesn’t come from green tomatoes. It instead comes from the tomatillo plant.
And although the name tomatillo in Spanish translates to “little tomato”, it’s actually not a tomato plant at all. It is, however, a close relative.
And, like tomatoes, can easily be grown in the garden, or even in pots and containers.

Both tomatillos and tomatoes are members of the nightshade family. And because of their similarities, tomatillo plants grow well using many of the same methods that work to grow tomatoes successfully.
Here is a look at how to easily plant and grow tomatillo plants – and to know when and how to harvest. And we even included a simple, tried and true recipe for fresh salsa verde at the end of the article so you are ready to roll when your plants start producing!
Although there is a slight range between varieties, most tomatillo plants mature near the 100 day mark. Because of this lengthy time, much like with tomato plants, it’s important to grow from transplants, not seed.

Unfortunately, in most climates, direct seeding simply doesn’t allow enough time for maturation.
Seeds should be started six to eight weeks before planting outdoors. To know when to start, simply count back from your regions last frost date.
Once the soil has warmed and the threat of frost has passed, plant outdoors in well drained, fertile soil.
Tomatillo plants actually require a bit less from the soil than tomatoes do. But with that said, amending the soil with compost at the time of planting will help roots retain moisture while providing additional nutrients.

A few cups of compost mixed into the soil for each plant will more than do the trick. When planting, bury the transplants deep in the soil. A good rule of thumb is to plant half of the transplant underneath the soil to allow for better rooting.
Last but not least, you need to plant more than one tomatillo to get fruit production. Tomatillos are not self pollinating, so at least two plants are needed to allow for fertilization of the blooms. Seed Product Link : Tomatillo Seeds
This is extremely important to remember when planting in pots or containers. Plant multiple plants in a single large pot, or at least two small pots with one plant each to ensure a viable crop.
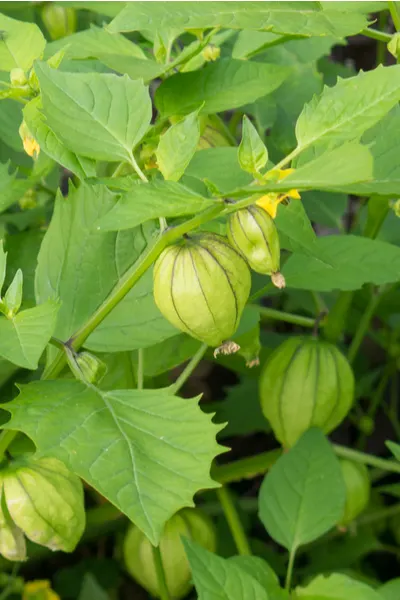
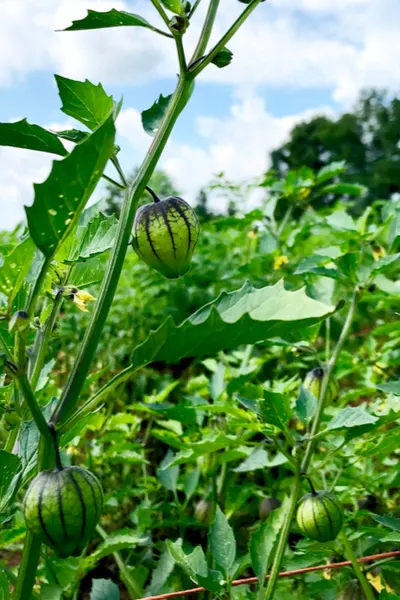
Like tomatoes, tomatillos benefit greatly from a bit of support. The best way to do this is with a stake, cage, or trellis.
First and foremost, it helps keep the plant’s stems and branches off the ground and out of harms way. But it also allows for good air circulation around the plant’s foliage and ripening fruit.
Good circulation is important for both pollinating and setting fruit, as well as helping fruit ripen more rapidly.
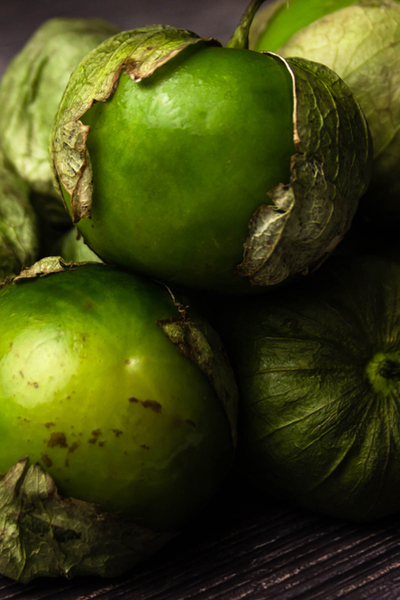
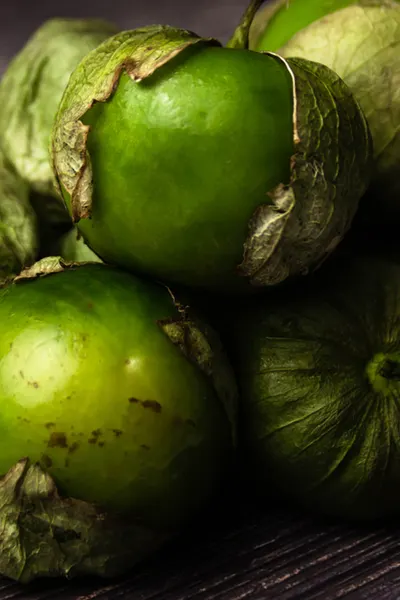
The fruits of tomatillos are ready to be picked as soon the husks fill out and begin to split open.
And continuing to pick fruit as it ripens is a big key to long-term harvesting.
Much like tomato, pepper and cucumber plants, tomatillos can suffer from fruit overload. If a plant becomes too full of ripening fruit, it stops producing new blooms in order to concentrate its energy on ripening the excess fruit.
So remember, the more you pick, the more you get!
When those tomatillos ripen, here is a simple way to make delicious fresh salsa verde in a flash!
Simmer the tomatillos and garlic in a pot of water for 10 minutes. Drain water and place all of the ingredients in a blender. Blend until smooth, adding salt to taste.
Then pop in the refrigerator to chill, and then serve and enjoy. Here is to growing your own great crop of tomatillos this year!
For more great articles on growing vegetables in the garden, check out our Vegetable Garden Page on the blog.
This Is My Garden is a website dedicated to spreading the love and knowledge of gardening around the world. We publish two new garden articles each week. This article may contain affiliate links.
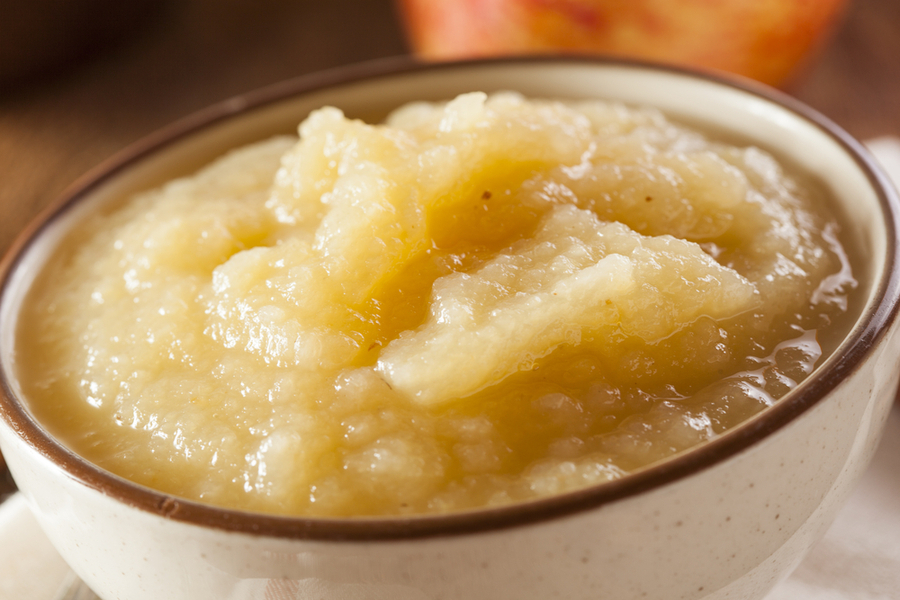
It’s apple season, and we couldn’t be happier that one of our loyal readers has shared her family’s famous homemade freezer apple sauce recipe for all to enjoy!
To be exact, it is actually her Aunt Jeanie’s famous homemade freezer apple sauce recipe!
In addition to our weekly gardening articles, we try each month to highlight a backyard recipe from one of our followers. (See : This Is My Garden Recipes Tab)
This month, as Autumn settles in, we thought it was the perfect time to share a timely apple sauce recipe from Candice Cromine. Candice hails from the great state of Washington.
Apples are a big deal in Washington. Apple season begins near the mid-point of August, and runs all the way into November.
Great apple sauce starts with a mix of apples
According to the Washington State Apple Commission’s website, there are about 175,00 acres of apple orchards in the state. And combined, they produce over 2.5 million tons of apples each year!
Today’s recipe, from Candice Cromine, comes straight from Wenatchee Valley, which is in the heart of Washington’s apple country.
Here is Canidice’s story and freezer apple sauce recipe shared from her letter to us:
My Aunt and Uncle had a small little orchard in the valley, every year my Aunt Jeanie would make apple sauce from all of the seconds from the trees.
The seconds were still amazing apples, but had a blemish here or there. It was hard to sell them in the markets, but they made amazing apple sauce.
Aunt Jeanie always said the key to great apple sauce was making it from different apples. She would peel, core and cook down a mix of Golden Delicious, Fuji and Cortland apples to make hers.
Peel and slice apples into small chunks to help speed up the cooking down process
She would cook down a huge pot on the stove, and then let it cool.
Jeanie never canned her apple sauce. Instead, she placed it into quart freezer boxes to have anytime. We always referred it her “famous freezer apple sauce recipe.” I always loved having it after it had just barely thawed out. The little ice crystals and the sugary-sweet apple flavor was simply divine!
You can use any mix of good saucing apples, but Jeanie always used an equal mix of Golden Delicious, Fuji and Cortland apples. We have experimented with other apples with good success, but those three varieties seem to work perfectly together.
Be sure to use soft apple varieties to make apple sauce. Crisp apples take a long time to cook down and usually do not have the flavor.
One thing is for sure, a hand cranked peeler and corer is a must if you are going to make it often! It makes quick work of preparing the apples. Here is our family recipe from Jeanie we still use today.
3 pounds each of 3 types of apples
1.5 cup apple juice or apple cider
6 Tbsp of lemon juice (1 lemon)
1 cup light brown sugar, packed
2 teaspoon cinnamon (optional)
2 Teaspoons of nutmeg
Peel, core and slice up the apples into small chunks. The smaller the chunks, the quicker the apples will cook down. Add all of the ingredients together into a single large pot.
Cook down on medium-low to medium heat to prevent the apples from burning on the bottom of the pot. Stir every 5 to 10 minutes.
The apples will usually cook down in about 30 to 45 minutes. You want them to be soft to the touch, easily smashing apart when pressed with a spoon. Helpful Product Links : Apple Peeler / Corer – 50 Pack Freezer Boxes
An apple peeler makes quick work of preparing apples.
Aunt Jeanie used a potato masher to smash the apples into apple sauce. We use an immersion blender to blend it together today. It is a bit quicker than the old potato masher method for sure!
The key is to not over blend. We like to have a bit of small chinks here and there. I think it gives it more flavor, but it might be because it reminds me of Aunt Jeanie’s. As soon as it cools, it can be placed into freezer boxes or even bags to freeze.
The apple sauce will store fresh in the refrigerator for a few weeks as well. It can be stored in the freezer for 6 months, although our freezer apple sauce never lasts that long!
Thank you for letting me share my family’s recipe! Candice
This Is My Garden is a gardening website created by gardeners, for gardeners! We publish two garden articles every week, 52 weeks a year.
Sign up below to follow along via email, and be sure to follow us on Facebook @ TIMG as well. You can also share your backyard gardening tips or stories with us at info@thisismygarden.com to be our next feature! This article may contain affiliate links.
You might be surprised just how simple, quick and easy it is to make homemade hot pepper flakes from the hot peppers growing in your garden!
Hot pepper flakes are a great way to spice up everything from morning eggs to a slice of pizza. And if you have a bumper crop of hot peppers growing in your garden this year – making homemade hot pepper flakes is the perfect way to preserve them.
The best part of all, it doesn’t require a lot of fancy canning and preserving equipment to make them. All you need is a cookie sheet, an oven, a coffee grinder or food processor, and of course, a supply of hot peppers – and you’re in business!

You can make hot pepper flakes from any hot pepper growing in your garden. The formula is simple. The hotter the pepper you use, the hotter the flakes will be!
Cayenne and red-hot chili peppers are the traditional choices, but it can be fun to experiment with different varieties and colors of peppers.
You can even mix and match hot peppers in the same batch. It allows you to create a blend of homemade hot pepper flakes unique to your garden!
Before Your Make: Before working with hot peppers, be sure to take a few precautionary options. Always use a good pair of rubber gloves to keep the hot peppers from burning your hands. Also be careful not to touch bare skin or rub your eyes during the process. You will know it if you do!
Much like when preserving or canning any vegetables, select only firm, ripe and blemish-free peppers. Rinse and clean the peppers with water, and place on a clean towel and dry. Next, remove the top stem by slicing off the top of the pepper with a sharp knife. Do not remove the inner seed core. This is what will give the homemade hot pepper flakes their heat!
Place the peppers on an aluminum foil-covered baking sheet. Be sure to protect and cover your baking sheets prior to placing the peppers on them. If you leave uncovered, you will forever be creating hot cookies and more – anytime you bake!
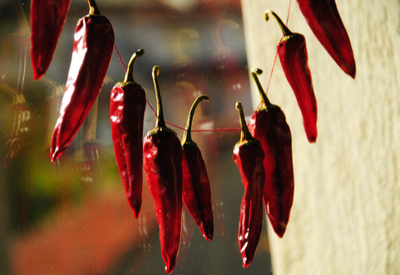
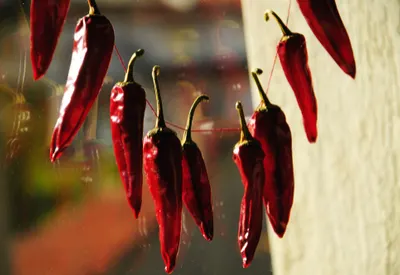
Although peppers can be dried traditionally by hanging, they can take weeks or even a month or more to dry. With the oven method, you can have finished hot pepper flakes in just a single day.
Place the peppers in the oven. You can fill both racks with cookie sheets if you have enough peppers. For most ovens, you can fit up to 4 total baking sheets of peppers. Turn the oven to 180 degrees, and go about your day.
The length of time it takes to dry and roast will depend on the size and moisture content of the peppers. For most small varieties such as cayenne or red chili – it will take between 8 and 10 hours to completely dry the peppers.
It is best to keep the kitchen well ventilated with an open window during this process. It can create a bit of heat in the air if air flow is not present.
When the peppers have turned crisp and dry, remove from the oven. Allow the peppers to cool completely. Now its time dry and store!
Once again, put on protective gloves before touching the peppers. Place the peppers into a food processor or food chopper. Coffee bean grinders work extremely well for this too.
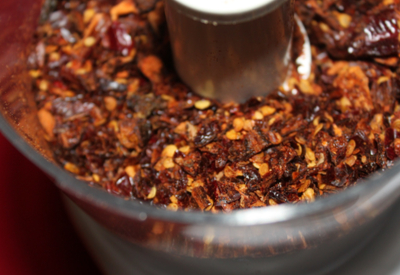
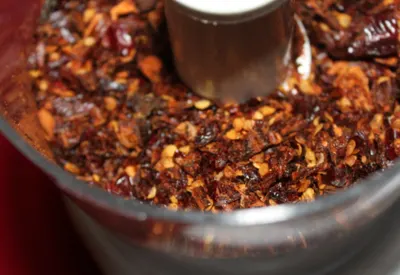
Simply grind and pulse to the desired fineness, and your homemade hot pepper flakes are ready to go! Product Links : Mr Coffee Bean Grinder – $16 – Hamilton Beach Food Processor – $45
You can even create your own hot pepper powder by pulsing until the peppers create a fine powder. Just run the mix through a sifter or screen to remove the seeds to filter.
Hot pepper flakes and power will keep for 6 months to a year when stored in an air-tight container. You can also store in the freezer to keep fresh longer.
This Is My Garden is a gardening website created by gardeners, for gardeners! We publish two garden articles every week, 52 weeks a year. Sign up below to follow along, and follow us on Facebook @ TIMG as well. You can also share your backyard gardening tips or stories with us at info@thisismygarden.com to be our next feature! This article may contain affiliate links.